Wednesday, March 28, 2007

Strawberry Turnovers

My tax return came in recently, and with it I bought a digital scale. I've actually been playing with it for a few weeks now, and I absolutely love it. Having a decent scale is something that I really miss from my days in a professional bakery. Of course, the problem now is, I'm converting all of my recipes to measure by weight, instead of by volume. This will probably alienate a few people, and for that I am sorry. All I can tell you is that you need to buy your own scale anyway. You'll be happier with it.

I got a wild hair the other day and decided to play with puff pastry. I already had strawberries in the freezer, fresh from our landlord's parents' garden up in Montana, or so I've been told. So I decided to make some strawberry turnovers.

I didn't want to just have strawberries in the middle. I wanted something a little closer to strawberry pie filling, without actually tasting like the atomic red bags and cans of sugary, not-quite-strawberry-tasting awfulness at the grocery story. I started with a half cup of orange juice (yes, I still measure liquids by volume) and five ounces (by weight) of frozen strawberries. I added a tablespoon of agave syrup (hey, I was experimenting) and brought this mixture to a simmer in a small saucepan. When the strawberries had softened enough, I pureed them with an immersion blender.

I then added another fifteen ounces, by weight, of strawberries and let it simmer another couple of minutes, until all the strawberries had started to soften. This mixture was strained, and the juice was reserved in one container, and the whole strawberries in another. Both were placed in the fridge to cool. I don't know what I'm going to end up doing with the liquid, but I'm sure I'll find something. Maybe I'll just drink it. When the strawberry mixture had cooled, I mixed in three ounces, by weight, of shortbread cookie crumbs leftover from my most recent cheesecake venture.

The puff pastry I buy comes as two frozen tri-fold squares. I let it thaw, and then I rolled it out into somewhat flatter, but larger squares. I cut each of those into quarters, leaving me with eight squares. Two adjacent sides of each square were brushed with egg wash (a beaten egg plus a tablespoon of water). The strawberry mixture was divided across the eight sqaures, which were then folded over into triangles. Make sure the corner without any egg wash is folded onto the one with egg wash, and be careful to make sure the filling isn't oozing out the sides.

With a fork, I crimped the sides that were glued together, and then I used a sharp paring knife to slice two slits into the top of each pastry. I brushed eggwash over the top of each one, and then sprinkled with sugar. If I'd had access to coarse sugar, I would have used it, but since I didn't, I used regular old white sugar.

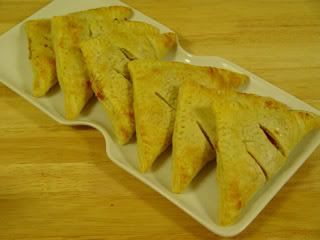
I could only fit six pastries onto one parchment-lined sheet pan, so I put the last two on another pan and set it in the fridge to chill until it was ready. The rest were baked at 400F for about fifteen minutes, or until golden, brown and delicious. When they came out, I baked off the last two. As soon as the turnovers were out of the oven, I slid them off of the baking pan onto a cooling rack to rest, and when they were cool, I plated them.


Notes: This wasn't a perfect recipe. My wife claimed to love them, but I thought the filling was kind of pasty. The cookie crumbs were supposed to keep the strawberries from leaking all over, but I think I added too many of them. Maybe next time I'll cut that amount in half and see how it goes. I've also thought about adding in a slurry of tapioca starch after liquifying the first part of the strawberries, and then bringing it to a boil to thicken before adding the other strawberries. Also, the mixture was a little tart. I will probably try real sugar next time. Also, I think I might have underbaked the turnovers. They tasted a little doughey when I tried a warm one, but were just fine when cooled. Despite my complaints, I think they still turned out pretty nice.

Monday, March 26, 2007

Starting a Garden

This year I'm going to attempt something that I have never successfully done before. I'm going to try, once again, to grow plants for the purpose of consumption. I'm starting a garden.

I'm actually going to try two different gardens this year. I have a couple of friends that live near me that have a garden in their back yard. They apparently like to invite other friends to share in their gardening, and this year my wife and I decided to take them up on their offer. Since they actually know what they're doing, I suspect that my plants will have a little better chance.

I'm also going to try my hand at hydroponic gardening. I only know one other guy who has ventured into this arena, and I think he's about as new at the game as I am, but maybe he'll be able to help me out anyway. I'm planning to use some plans that I found on the Make blog last year.

Despite my ineptitude in years past, I feel that I have a much greater chance of success this year. This is partially because I won't be the only one tending to my plants. But it's also because this year, I have some seeds that I'm really, really excited about. This weekend I received two packets of bhut jolokia seeds from the Chile Pepper Institute. The bhut jolokia is reportedly the hottest chile in the world, and you know how I like spicy.


One thing that I found interesting upon opening the envelope with the seeds was that the seeds actually had their own EULA.


Don't worry guys, I don't plan on selling the seeds. I just plan on torching a few taste buds. But this is also a good chance for me to learn a little about gardening. What kind of chef doesn't know anything about the place from whence his food comes? Probably not a very good chef. I'm also going to perform a comparison between the two different growing methods. I'm going to start all of my seeds in little pots, and then transplant them when they're ready. Half will be grown in a traditional garden and half will be grown hydroponically. I'll post updates periodically, and we'll see if I can grow my own chiles.

Monday, March 19, 2007

Good Eats Cooking School Basics: Cooking Methods

My boss seems to have gotten himself hooked on a couple of Food Network shows lately: Good Eats, and Iron Chef America. In fact, I've been letting him borrow my Good Eats DVD's, and he's been tearing through them like a man possessed. As I arrived to work this morning and was getting set up for the day, he asked me a question. Are there any Good Eats episodes that cover cooking school basics? It was an interesting question, and while a couple of episodes immediately sprung to mind, I knew that there were several.

My first step was to head over to the episode guide on the Good Eats Fan Page. As I perused the episodes, I started to categorize some of the episodes. As it turns out, much of my first 6 weeks of cooking school has been covered by Alton Brown. While nothing (and I mean nothing) will ever take the place of hands-on training by seasoned chefs, there are a few episodes that will help out a lot. In fact, if you're planning on signing up for cooking school, I highly recommend you check out these episodes first.

In this post, I will list some episodes that cover the basic cooking principles: roasting/baking, grilling/broiling, steaming, poaching, sautéing, pan frying, deep frying and braising.

Roasting/Baking
Yes, roasting and baking are exactly the same cooking method. The difference is that baking usually (but not always) refers to breads and such, and roasting refers to pretty much anything else, primarily meats and veggies. If you're cooking it in an oven, then you're using (at the very least) the baking/roasting method. And I don't know that any episode covers this method better than Celebrity Roast. While the recipe itself is a standing rib roast, he covers all sorts of angles as to how it works from a scientific standpoint, and how to get the best performance out of your oven.

Grilling/Broiling
Grilling is another basic cooking method with another name: broiling. The difference? Grilling has the heat coming up from the bottom, and broiling has it coming down from the top. Other than that, they are the same method, based on radiant heat from one side. While you might think that Grill Seekers sounds like the perfect name for a grilling episode, it actually used the grill to perform the roasting method. It does have a killer discussion of charcoal, however. Chops Ahoy, on the other hand, was in my opinion designed to teach you about the grilling method, including a discussion of natural gas grills. If there's any confusion about broiling, I suggest you check out Deep Purple, which features a fine demonstration of broiling, even referring to the broiler as an upside-down grill.

Steaming
An unlikely-seeming episode that covers the steaming method is The Pouch Principle. One might think that pouch-based cooking (such as fish en papillote) is a baking method, but I beg to differ. When you enclose a food like that in a pounch, the steam escaping from the food is also enclosed, which causes the food to steam itself. Not good enough? Check out Crustacean Nation II: Claws for further discussion of the steaming method, as applied to lobsters. For a more scientific discussion, I recommend Wonton Ways.

Poaching
In an act of basing an entire episode around a cooking method, rather than a speficic ingredient or dish, Alton Brown has given us Mission: Poachable. This isn't just basic cooking school stuff. I used one of the recipes (Catfish au Lait) for one of my first projects in cooking school. A scientific discussion of poaching principles is discussed, and he even covers another basic principle that we learned in those first six weeks of school: court bouillon. He also teaches the perfect poached egg, in roughly the same manner as my own chef instructors used.

Sautéing
A lot of people don't realize the difference between sautéing and pan-frying, but there is one, and it largely involves the amount of fat used. While a scientific explaination is lacking in this episode, The Fungal Gourmet does explain in layman's terms exactly what it means to sauté, and provides an excellent demonstration. But to really understand the difference, it helps to compare a demonstration of the sauté method with a demonstration of...

Pan Frying
Yes, there is a difference. You can see a lovely demonstration of this in several episodes, but the earliest is Hook, Line and Dinner. As you will see, a good deal more fat is used with this cooking method than with sautéing. In fact, while sautéing seems to be designed for looking cool while tossing veggies in a pan, if you try it with the pan-fry method, there will likely be kitchen fires and/or severe burning.

Deep Frying
Another episode that has been based entirely on a cooking method, Fry Hard brings us back the realm of scientific explanations. A lot of people don't realize that there is a difference between pan frying and deep frying. They just think that frying is one cooking method. This episode provides an excellent discussion of what deep frying is, how it works, why it works poorly sometimes, and how you can make it work well for you. When I was in cooking school, I even loaned a copy of the Cable in the Classroom version to my nutrition instructor, who showed it to our class.

Braising
This is an odd method, since it usually involves at least one other cooking method (usually baking). It's kind of like pan frying, at a lower heat, and with something other than oil, such as some kind of sauce. It's really good for long, slow cooking times, and for meats that have a lot of connective tissue to be broken down. My first experience with this was a braciole from Fit to be Tied, which again, I used for a practical exam in cooking school. A lot of people really like the example in Pork Fiction as well.

Sunday, March 18, 2007

Beastie, the BSD Mascot

Well, I was finally able to write up the tutorial for the Beastie Cake. For those of you who missed it, at this month's past PLUG meeting, we presented a cake last Wednesday in the shape of Beastie, the BSD mascot.


It was largely a success, marked by the occassional design disappointment. All in all, I think everyone enjoyed it. The inside, of course, was devil's food cake with cream cheese frosting. There were Rice Krispies Treats involved as well, which were also quite tasty. For the photos and tutorial, click here or head over to the tutorials section.

Special thanks to Kirk McKusick for permission to use Beastie. BSD Daemon used with his permission.

Wednesday, March 7, 2007

Deseret News Article

Welcome Deseret News readers! For those of you who haven't heard yet, I was mentioned in an article in the Deseret Morning News today about food bloggers.

For those of you who are new here, let me tell you my story. I am a computer geek. Some years ago I abandoned the tech industry to go to cooking school at the Atlantic Culinary Academy in Dover, NH. Shortly before graduating, I was interviewed for an article in the Boston Globe about former techies starting over in new fields. I was quoted as saying, "the Internet thing was not panning out".

Around that same time, I was seeking out an internship. I doubt she remembers this, but I emailed Valerie Phillips, the food editor at the Deseret News, asking for advice. Her reply was prompt and thoughtful, and found me working for a season at the Deer Valley ski resort.

As the ski season ended, the Internet thing started panning out. I'm now a QA Engineer at United Online, which really is the best job that I've ever had (Deer Valley is a close second). I'm cooking in my spare time, with a focus on baking. Lately I've been building cakes, such as the 3D Tux the Penguin Cake and the Black Chandelier cake. You may also want to check out my Firefox Cookies and my Ubuntu Cookies.

Thank you for visiting my little blog, and I hope you enjoy your stay!

Tuesday, March 6, 2007

Utah Open Source Conference 2007

I'm pretty excited about this. In speaking with Herlo recently, I was asked to help out with the Utah Open Source Conference. Specifically, I was asked to help out with the food situation, and maybe even do an open source cooking demo. Whether or not the facilities people will allow us to do this still remains to be seen, but I'm hoping for the best. If they decide not to allow it, then I will likely still present on open source and cooking.

As fascinating as I know you all think my presentation will be, it will not be the only one. In fact, we have now officially opened a call for participation. Anyone is welcome to submit an idea for a topic that they would like to present on. Since I'm probably not the best to give you all the details, you'll want to check out the Utah Open Source Conference website at http://www.utosc.org/.

Of course, even if you don't have something that you would like to present on, I still encourage you to check out and attend the conference. There will be a wealth of information available to developers, businesses, students, even educators. It's a pretty exciting time, and I'm glad to have gotten involved. I think you will be too.

Latent Heat

I just found out the coolest thing, no pun intended. Hans showed me an article today that contained a hypothesis of why steamy ovens make for better bread crusts. This is a well-known fact in the baking world, and few professional bakers have never heard the phrase, "steam-injected oven".

The key, according to the hypothesis in the article, is something called latent heat. This refers to the amount of energy it takes for a substance, such as water, to undergo a phase change, such as from liquid to gas. This is different from that substance's specific heat, which is just the amount of energy required to raise its tempurature within a state (such as bringing water to a boil).

As we all know, water can only be heated to 212F at sea level pressure. When one goes above sea level, water boils at a lower heat, with the boiling point dropping about 2F for every 1000 feet above sea level. When one applies pressure, such as with a pressure cooker, they can force water to boil at a higher tempurature.

Unfortunately, we are taught that since water cannot go above 212F under normal circumstances, that means that steam (which is composed primarily of water) is also no hotter than 212F. I've questioned this fact personally, because it didn't make sense to me. If steam was only 212F, then wouldn't it still be just boiling water?

As the article points out, the idea behind latent heat describes why a pot of water doesn't just turn into steam as soon as it reaches a boil. While it takes a lot of energy to cause water to boil, it's nothing compared to the amount of energy it takes to change that water's state from a liquid to a gas. The really important thing here is that when it changes back from a gas to a liquid, it has to release that energy. When you bake a loaf of bread in a steamy oven, the water condensing on the side of the loaf is releasing energy into the loaf, which forms that crust that has artisan bread lovers world-wide going crazy.

Now that I've just regurgitated the content of that article (you should read it anyway), here's the part that I found important. I've recently seen mention of water crocks, and how their porous clay surface somehow manages to cool down the water inside. Everything I've read talks about how it's due to the moisture evaporating from the surface, and then just leaves it at that, as if that's enough of an explanation. I think you already know that it's not enough for me.

When I read how latent heat works, I realized that the energy required for that moisture to evaporate from the sides of the crock is causing a cooling effect to the rest of the vessel. In case you haven't figured it out already based on everything I've already said, this is because energy is being sucked from the vessel into the moisture that is now evaporating. Ancient civilizations have supposedly managed to make ice this way, even when the tempurature outside is well above freezing.

I'm pretty happy to have found out about the concept from Hans and from the article, and even happier to have worked out the water crock thing myself based on that information. Hans may be using this to make his bread crust better, but for me, it's time for me to look into buying or building a water crock to play with this.

Friday, March 2, 2007

Mini Gnome Cheesecakes

Whenever I make a tuna fish sandwich, I always make sure to save and wash the empty can. In fact, I also save the empty cans from sliced olives, pineapple tidbits, and anything else that doesn't have ribbed sides. Of course, I also save the lid that was cut away from the can. Believe me when I tell you that I have a whole box of these things.


To what end so I save these? They are gold. Free cooking equipment, and that's a deal I never like to pass up. The olive and pineapple cans are especially handy because the bottoms can be cut away with a can opener, just as easily as the tops. This makes them ideal to use as little pastry rings. Granted, you don't have the luxury of as many sizes as a professional set of rings, but you also don't have the cost.

The tuna cans aren't as nice, since the bottom is too rounded to be able to cut away with a regular can opener. But that's okay, because you can still use them for baking miniature cakes. Yes, you could also use muffin tins. But empty tuna cans are a little shorter, a little wider, and have perfectly straight sides. This makes them idea for individually-sized cheesecakes. Those of you who remember my posts on cheesecake and cheesecake crust should be familiar with these steps.

Tuna Can Cheesecake

Crust:
1 1/2 cups graham cracker/cookie crumbs
2 tablespoons (1/4 stick) unsalted butter, melted
1 tablespoon white sugar

Filling:
16 oz cream cheese, softened
1/2 cup sugar
3 large chicken eggs
1 teaspoon vanilla extract

Preheat the oven to 350F. You will need six empty tuna cans, with their lids. Be careful with those lids! They're sharp! To prepare the cans to be used as cheesecake tins, place the lids in the bottoms and give each a quick spritz of cooking spray. You don't need to get the spray on the bottom, but you do need to get it on the sides. Cut out strips of parchment paper to wrap around the sides of the tuna cans. The cooking spray will help it stick. It's okay if the parchment is a little taller than the cans, but not so much if it's shorter.


I used crumbled up shortbread cookies, but if you want to be boring, er, traditional then feel free to use graham cracker crumbs. Combine with melted butter and sugar, and then divide evenly between the six cans. I use a spice tin to pack down the crumbs, but you can use whatever you want.


Arrange the cans on a sheet pan. Bake the crusts for about 5 minutes at 350F, and then move to a counter to cool. In fact, once the sheet pan is cool enough to touch without hotpads, it wouldn't be a bad idea to move these to the fridge for a few minutes. You want them to be completely cooled before you use them.

For the filling, cream together the soften cream cheese and the white sugar until light and fluffy. Make sure to scrape the sides of the bowl and the paddle of your mixer a couple of times. The last thing anyone wants is a lumpy cheesecake. Add the eggs one at a time on low speed, waiting until each is completely mixed in before adding the next. Make sure to keep scraping every one or two eggs, to make sure everything continues to mix properly. Finish up by adding the vanilla the same way. Divide your batter between the six cooled crusts.


Bake at 350F for about half an hour, until the centers of the cheesecakes are just a little wobbly. No, you don't need a water bath. These won't be in the oven for long enough to overcook, another advantage to using smaller sizes. When the centers look good, turn the oven off and leave the door open just a crack for one minute. Then close the oven door and let the cheesecakes sit in the oven for another half hour as it cools down with them. The carryover heat from the oven and from the cheesecakes themselves will let them coast to a perfect finish. You can serve immediately (yet one more advantage of the small size, and not having to cut slices), or you can chill for a few hours first. When you're ready to remove them from the pans, just carefully invert into your hand, or onto a plate, and then turn over onto your final serving vessel.

We could just stop here, and have perfectly serviceable little cheesecakes. But that wouldn't be like me, would it? I think there are still ways for us to improve upon this dessert. Specifically, we need some artwork. And truly, is there anything more appetizing to see on a cheesecake than a stylized footprint? What we need is the Gnome logo. I'm sure you all remember the template I made for my Firefox cookies, right? Pick up a blank stencil sheet from your local crafty-type store and cut out a Gnome logo, or whatever other image you want. Try not to go bigger than about 2 1/2 inches around, or else your design will be too big for your cheesecakes.

Lay your design on top of one of the cheesecakes. Don't worry, if you're using a plastic stencil sheet like I did then stickage will be minimal. It really does need to be right on top of the cheesecake, or else you'll get fuzzy edges.


You'll need a shaker full of cocoa powder (Dutch-processed, if you can find it) for the next part. If you don't have one, then a little sifter full of cocoa powder will do. Being careful not to get any on any of the other cheesecakes, shake enough cocoa powder on to fill in the design in the stencil. When you think you have enough, carefully remove the stencil, being careful not to spill any of the excess cocoa powder. When it's a safe distance, go ahead and shake the excess into a bowl, to save for later.


When you've finished with all six cheesecakes, go ahead and chill until you're ready to serve. This is one dessert that's definitely sure to please. And while a Gnome foot would be ideal, you can use any design that you can cut out of a blank stencil sheet.


Special thanks to Mairin Duffy, for permission to use the Gnome logo!