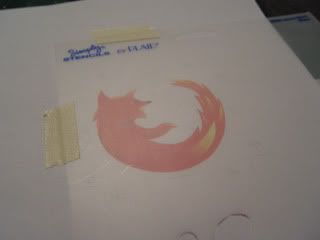
First, I needed a template. Those of you who read my post on hippen paste may remember the template that I used for the Gnome foot. While I was working on that, I decided to get a couple more logos on there as well, just in case. One of those logos was the Firefox logo. If you look closely at the photo, you should be able to see what kind of blank template I used. I printed out just the fox, taped my blank stencil to it to make sure there was no sliding around, and then cut out the outline of the fox with an X-acto knife.
For those that are interested, I printed my logo three inches wide. With that out of the way, it was time to make the cookies. I only used one batch of sugar cookie dough, which you may remember from the Ubuntu cookies. I divided that dough in half, and then divided one of those halves in half again. The other half was divided into 1/3 and 2/3-sized pieces. The 1/3 was colored yellow, the 2/3 colored orange, and the other two pieces were colored light blue and dark blue.
The idea was to marble the colors together, in an attempt to achieve the same kind of coloring that Jon had in his logo. Unfortunately, the cookies were a little small for the marbelling to really show up on each individual one, especially with the orange and the yellow. That was the part that didn't work out as well as I had hoped. While some marbelling did show, I might as well have just stuck with half orange and half blue. C'est la vie.

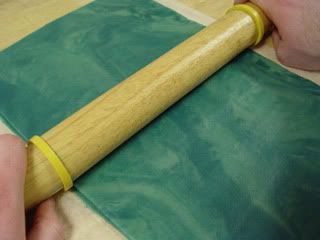
I wanted my cookie dough to be pretty much the same thickness all the way through, so as you can see in the photo, I used rolling pin spacers. In fact, I probably used the 1/8-inch spacers. The problem was, since I like to use a European-style rolling pin, the spacers were kind of close together. So as I would roll out dough and it would get too wide, I would have to cut away the excess with a pastry cutter (more commonly known in America as a pizza cutter). By the time I got to the orange dough, I got sick of the spacers and went freehand. It worked out almost as well.
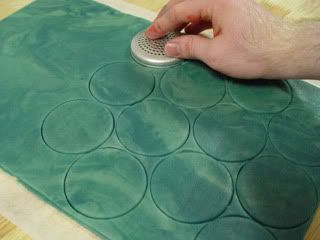
Of all my pastry tools, I still haven't bothered to buy myself a standard set of round pastry cutters. I have fluted ones, but that wasn't goind to work. Fortunately for me, I did have the lid from one of my shaker cans that was exactly the right size. The key here is to get as many cuts as possible out of one piece of cookie dough. If you cut your circles out like a chess board, you'll be wasting dough. Go for a brick-layer pattern instead.
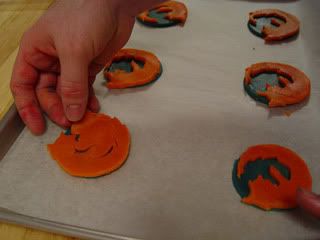
Now for the hard part. Actually, it's more tedious than difficult. You see, I don't have a Firefox cookie cutter. Yet. And even if I did, there's a lot of sharp points and curves in the fox itself. But I do have the stencil that I described above. The key is to use a paring knife like I did, or any other knife with a narrow tip. In retrospect, my boning knife probably would have been perfect. Yes, you could use an X-acto knife like I did to cut out the template. But the blade is way too sharp, and will likely start to leave nicks in the template.
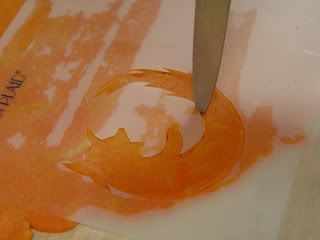
You can see how the template sticks a little bit to the dough, and that's a good thing. You don't want it sliding around at all here either. You'll also notice that your cuts aren't perfect. Don't worry about it, it's not like you're painting the Sistine Chapel, and your cookies aren't going to last as long as that either.
I found it easier to lay out my blue rounds on a parchment-covered sheet pan, cut out each fox individually, lift up the corner of the parchment to drop the fox upside-down onto my hand, and then flip it back onto the cookie. I also found it easier to wait until it was on the cookie to remove the center piece of dough.
When I had a full sheet of cookies, I would move it to the oven and start on the next sheet while the first was baking. I started to get pretty quick with the stencil, and by the time one sheet came out of the oven (about 10 - 12 minutes), I would already have the next ready. If I had time, I would pop the sheet into the freezer for a couple of minutes to help firm up the dough a little bit. Remember, cold dough spreads less, and this dough has a lot of detail.
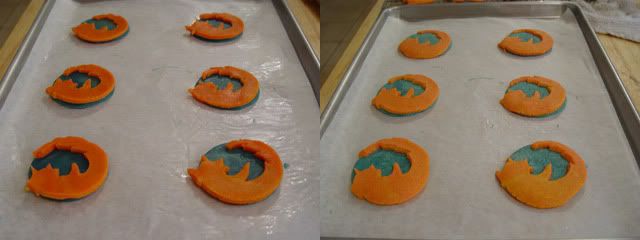
You can see that there will be a little speading, but hopefully not too much. In fact, I was surprised that mine spread so little. The sharp edges actually stayed relatively sharp. That was the part that worked out better than expected. There were a couple of nice things about the method used for these cookies, as opposed to the extrusion method used for the Ubuntu and Tux cookies. First of all, can you imagine trying to extrude the shape of the fox? And then trying to extrude a perfect fit for the globe that it was wrapped around? Good luck with that one. Cutting with the stencil may be tedius, but I would take it any day over the extruded version. Second, the fox in the logo is kind of in front of the globe. It's nice to have the same thing going on in the cookie version.
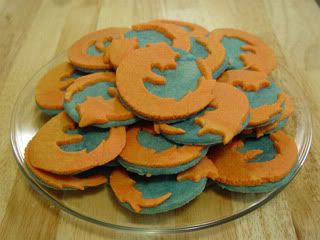
So there you have it, a plate of beautiful Firefox cookies, perfect for any holiday or geek party. Of course, you don't have to stick with a Firefox design. My intention in showing you this design is to teach you techniques that you can use for your own cookies, or even other pastries. I hope to start seeing similar cookie designs popping up on the Internet, and I hope whoever does them decides to keep the instructions open source, like I did here.
Digg This
You did it again! I'm amazed...
ReplyDeleteVery good. Thanks for sharing :)
ReplyDeleteThere is some definite art in your work - not just cooking skills. Impressive stuff again.
ReplyDeleteBehind every TASTY pretty cookie you make is a prettier wiff who can't cook.
ReplyDeleteWow! Seeing these cookies absolutely made my day, thanks.
ReplyDeleteCookies already are in firefox :) You can delete (eat?) them.
ReplyDeleteThis is SUPER! :D
ReplyDeleteGreat! Now, how do they taste?
ReplyDeleteThese look great. One question: Where did you find the firefox logo split into layers (such that you could split the "fox" from the "globe"). I've tried googling and I can find the flattened logo in a menge of sizes, but no layers :(
ReplyDeleteThe local surplus store has strip stainless steel, which I would like to try and make a fox cutter (sounds mean, doesn't it?!)
-sean
Anon: They taste like sugar cookies. Not bad, but a few dozen might make you tire of them.
ReplyDeleteSean: I found a very large version of the logo, then removed the blue part and shrunk it to fit my needs. I don't know if there are copies of it anywhere in layers, but it's pretty easy to do it yourself.
And where Pac-man`s cockies? (-:
ReplyDeleteYummy :)
ReplyDeleteWaow, nice job ! I just have one question to you : How do you color the dough when it's solid ? You put the coloring after it has been in the fridge ?
ReplyDeleteIs it possible ? oO
Very cute :)
ReplyDeleteArt: It's easier to color the dough before it goes in the fridge, but not required. It just takes longer to knead in the color once it's cold.
ReplyDelete