When one posts something on the Internet, it is foolish for them to think that it will be ignored. And when one posts something, full-well knowing that it will not be ignored, it is foolish for them to think that it will not be criticized at some point. While I did not harbor this delusion, it was also not a thought that occurred to me. I didn't spend a string of sleepless nights wondering what people would think. I didn't live in days of constant fear of what the critics would think. I posted information that I thought would be interesting to some, and hoped that it would also be informative. To say that I actually expect anyone to attempt half of what I post would be... well, that would just be silly.
That said, I came across something interesting today in my stats. Somebody not only attempted my Ubuntu cookies, but then reviewed my procedures. Apparently my writing left them with that warm fuzzy feeling that one gets when they know they're about to do something really good, and really enjoy it. Sometime later, they realized a fact I failed to include: some of the stuff I do is really hard, and largely a waste of time.
Why then, do I do it? Why do I spend countless hours in my kitchen, putting together some crack-pot recipe and/or design that I know that nobody in their right mind would attempt, and then post tutorials and walkthroughs? The main reason is practice. There are few things that I love in life as much as the kitchen. I will spend the next couple of decades paying off student loans from cooking school, unless something really lucky happens to me financially, and I don't even work in a professional kitchen. Cooking is a labor of love for me, and an obsession. I'm not happy just being a good cook. I want to be a better cook. And so I challenge myself. A lot of what I do is little more than proof of concept. But as I work through my challenges, I learn. As I learn, I get better. And as I get better, I think of new challenges.
That explains why I do these crazy things in the first place. So why post them? I want to share my experiences with others, in the hopes that they can learn from my mistakes and successes without having to experience them myself. Much of the information presented consists of things that professional cooks are never taught, but will eventually learn on their own. Some of them, such as Anthony Bourdain, have managed to land publishing and television deals that allow them to share such experiences. Most will never have that opportunity, except with those close to them. And if somebody does want to experience what I have already told them about? I wish them luck, and hope that they learn from it as I did.
How hard were the cookies? They were really hard. I actually did the Tux cookies first. They were incredibly difficult, and my freezer didn't handle all the opening and closing very well. Immediately after I finished them, I did the Ubuntu cookies. They were relatively easy, but only in comparison to the Tux cookies before them. Had I done them first, they would have been much harder. And the Firefox cookies? Compared to the Tux and Ubuntu cookies, making the Firefox cookies was almost as easy as eating them. And yes, anyone that would attempt to make a 3D Tux cake probably needs their head examined, including me. But I consider the knowledge I gained from making the Tux cake to be nothing short of invaluable. I do plan to make another 3D cake in the fairly near future, and I expect to use every piece of information that I learned in making the Tux cake. I don't, however, expect that cake to be any easier. With luck, it will be a lot more challenging, which will also make it just that much more rewarding.
I appreciate all those who write such reviews, not just about my work, but about all such efforts. I believe I learned from their article at least as much as they apparently learned from mine. To all of those who wish to attempt some of my creations: I wish you luck, both in your efforts and in the therapy that will likely follow.
Thursday, November 30, 2006
Wednesday, November 29, 2006
Dairy Percentages
Let us speak of butterfat, shall we? Butterfat.
I don't think most people realize this, but butter isn't 100% fat. Really! While we're at it, neither is margarine. However, shortening is 100% fat. But this post isn't about margarine or shortening. It's not even about butter. It's about butterfat. I present for you: The Chart.
As you can see, this shows the percentages of butterfat in several common dairy products. You may remember some of these percentages from my clarified butter tutorial. Knowing the percentages of various dairy products can help you cheat with some recipes, and hack others. But you really do need to know what you're doing, and how you're doing it. I'll get to that in a moment.
Powdered milk has managed to have had the water and fat removed, leaving you with little more than protein. In contrast, properly clarified butter is all fat, all the time. That's because you've managed to seperate the three basic components into layers, and then you've skimmed off the protein and dumped out the water, leaving you with nothing but the butterfat. This doesn't mean that it's exactly the same as shortening. Clarified butter can still go rancid, and should be refrigerated. Shortening has been processed and refined so that it can, and should be stored at room tempurature.
In general, the more fat a dairy product has, the better of a chance it has to whip up and incorporate air. In fact, you're not going to have much luck trying to whip anything with less than 30% butterfat. Also, the colder it is, the more easily it will whip. This is in contrast to egg whites, which prefer warmer tempuratures to whip, and will not whip at all if there is any fat present. It's a strange world that we live in.
The more you whip a dairy product, the more the fat globules will want to stick together. If you whip it enough, it's called churning, and it will cause so much fat to stick together that it starts to squeeze out water that was previously mixed in with it. It won't get rid of all of the water, but it will get rid of most of it, leaving you with what we call plain old "butter". The water that becomes seperated is called buttermilk, but it's not the same thing as the buttermilk that we buy in the store. Modern day buttermilk (aka "cultured buttermilk")is made using an entirely different process, which produces a slightly acidic milk that is popular in several cooking and baking applications, largely because of the acid.
The problem is with butter, all that whipping and churning can't be undone once it's done. You'll have little, if any luck melting down butter, mixing it with water, letting it cool, and then trying to whip it like regular old heavy cream. It just won't work. Anyone that would want to do that anyway should probably get their head examined. Or should they?
So long as you're not trying to whip it, there actually are other applications for such a thing. But you wouldn't just use water. Oh, no. You would want to use a more flavorful liquid, such as a fruit puree or even just a plain old fruit juice. Here's the way I figure it. Heavy cream is at least 36% butterfat, right? But the good stuff always has more. Not to endorse anyone, but the brand of heavy cream currently sold at CostCo is guaranteed to have at least 40% butterfat. I know several professional bakers that prefer to get their cream from CostCo for this very reason. Anyway, so we're shooting for around 36-40% butterfat. Whole American butter is somewhere around 80% butterfat. So if we mix together equal parts whole butter and, say, raspberry puree, then we'll come up with a raspberry-flavored cream that is about 40% butterfat. And since we're not planning on whipping it, who says we can't use it instead of regular cream to make a chocolate raspberry ganache? In fact, I have used this very same concept in certain desserts, and have had marvelous success with it.
What else can you do once you know the percentages? Well, let's take half & half as an example. What is half & half? It's half cream, half milk. I have a lot of ice cream recipes that call for part cream, part half & half. One day I wanted to make ice cream, but I was out of cream and only had half & half. What to do? Well, since it was going to be heated anyway, I did the math and upped the amount of half & half, and then added butter to make up the difference. My ice cream worked out perfectly. And you know, isn't it this kind of hacking that gave us things like half and half in the first place?
So now you know a little bit about hacking dairy products. Try experimenting with a recipe sometime. If it calls for milk, maybe you can get away with using a flavorful liquid and a pat of butter instead. If it calls for cream, maybe you can get away with equal parts butter and flavorful liquid. Hopefully this knowledge opens a few doors in your culinary world, as it did for me.
I don't think most people realize this, but butter isn't 100% fat. Really! While we're at it, neither is margarine. However, shortening is 100% fat. But this post isn't about margarine or shortening. It's not even about butter. It's about butterfat. I present for you: The Chart.
Dairy Item                   Percentage
Clarified Butter             100%
European Style Butter        82 to 83%
Whole American Butter        About 80%
Heavy Cream                  At least 36%
Whipping Cream               30 to 36%
Medium Whipping Cream        30 to 36%
Light Whipping Cream         30 to 36%
Light Cream                  18 to 30%
Half & Half                  10.5 to 18%
Sweetened Condensed Milk     9% and 40% additional sugar
Evaporated Milk              8% and 50% less water
Whole Milk                   4%
Low Fat Milk                 0.5% to 2%
Skim Milk less than          0.5%
Powdered Milk                0%
As you can see, this shows the percentages of butterfat in several common dairy products. You may remember some of these percentages from my clarified butter tutorial. Knowing the percentages of various dairy products can help you cheat with some recipes, and hack others. But you really do need to know what you're doing, and how you're doing it. I'll get to that in a moment.
Powdered milk has managed to have had the water and fat removed, leaving you with little more than protein. In contrast, properly clarified butter is all fat, all the time. That's because you've managed to seperate the three basic components into layers, and then you've skimmed off the protein and dumped out the water, leaving you with nothing but the butterfat. This doesn't mean that it's exactly the same as shortening. Clarified butter can still go rancid, and should be refrigerated. Shortening has been processed and refined so that it can, and should be stored at room tempurature.
In general, the more fat a dairy product has, the better of a chance it has to whip up and incorporate air. In fact, you're not going to have much luck trying to whip anything with less than 30% butterfat. Also, the colder it is, the more easily it will whip. This is in contrast to egg whites, which prefer warmer tempuratures to whip, and will not whip at all if there is any fat present. It's a strange world that we live in.
The more you whip a dairy product, the more the fat globules will want to stick together. If you whip it enough, it's called churning, and it will cause so much fat to stick together that it starts to squeeze out water that was previously mixed in with it. It won't get rid of all of the water, but it will get rid of most of it, leaving you with what we call plain old "butter". The water that becomes seperated is called buttermilk, but it's not the same thing as the buttermilk that we buy in the store. Modern day buttermilk (aka "cultured buttermilk")is made using an entirely different process, which produces a slightly acidic milk that is popular in several cooking and baking applications, largely because of the acid.
The problem is with butter, all that whipping and churning can't be undone once it's done. You'll have little, if any luck melting down butter, mixing it with water, letting it cool, and then trying to whip it like regular old heavy cream. It just won't work. Anyone that would want to do that anyway should probably get their head examined. Or should they?
So long as you're not trying to whip it, there actually are other applications for such a thing. But you wouldn't just use water. Oh, no. You would want to use a more flavorful liquid, such as a fruit puree or even just a plain old fruit juice. Here's the way I figure it. Heavy cream is at least 36% butterfat, right? But the good stuff always has more. Not to endorse anyone, but the brand of heavy cream currently sold at CostCo is guaranteed to have at least 40% butterfat. I know several professional bakers that prefer to get their cream from CostCo for this very reason. Anyway, so we're shooting for around 36-40% butterfat. Whole American butter is somewhere around 80% butterfat. So if we mix together equal parts whole butter and, say, raspberry puree, then we'll come up with a raspberry-flavored cream that is about 40% butterfat. And since we're not planning on whipping it, who says we can't use it instead of regular cream to make a chocolate raspberry ganache? In fact, I have used this very same concept in certain desserts, and have had marvelous success with it.
What else can you do once you know the percentages? Well, let's take half & half as an example. What is half & half? It's half cream, half milk. I have a lot of ice cream recipes that call for part cream, part half & half. One day I wanted to make ice cream, but I was out of cream and only had half & half. What to do? Well, since it was going to be heated anyway, I did the math and upped the amount of half & half, and then added butter to make up the difference. My ice cream worked out perfectly. And you know, isn't it this kind of hacking that gave us things like half and half in the first place?
So now you know a little bit about hacking dairy products. Try experimenting with a recipe sometime. If it calls for milk, maybe you can get away with using a flavorful liquid and a pat of butter instead. If it calls for cream, maybe you can get away with equal parts butter and flavorful liquid. Hopefully this knowledge opens a few doors in your culinary world, as it did for me.
Monday, November 27, 2006
Firefox Cookies
I hope everyone had a happy Thanksgiving Day weekend! I thought I'd try out a couple more cookie techniques this weekend, since I had a couple of days more time than usual. Interestingly, one of them wasn't nearly as successful as I had hoped, and the other was far more successful than I expected. Fortunately, with that switch-up going on, these Firefox cookies really ended up looking much better than I had hoped. Before I start, I'd like to thank Jon Hicks for his permission to use the Firefox logo that he designed. And yes, this tutorial proudly ships with the Firefox name and logo.
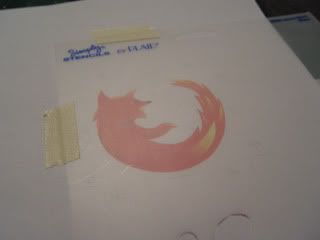
First, I needed a template. Those of you who read my post on hippen paste may remember the template that I used for the Gnome foot. While I was working on that, I decided to get a couple more logos on there as well, just in case. One of those logos was the Firefox logo. If you look closely at the photo, you should be able to see what kind of blank template I used. I printed out just the fox, taped my blank stencil to it to make sure there was no sliding around, and then cut out the outline of the fox with an X-acto knife.
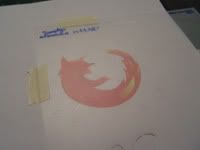
For those that are interested, I printed my logo three inches wide. With that out of the way, it was time to make the cookies. I only used one batch of sugar cookie dough, which you may remember from the Ubuntu cookies. I divided that dough in half, and then divided one of those halves in half again. The other half was divided into 1/3 and 2/3-sized pieces. The 1/3 was colored yellow, the 2/3 colored orange, and the other two pieces were colored light blue and dark blue.
The idea was to marble the colors together, in an attempt to achieve the same kind of coloring that Jon had in his logo. Unfortunately, the cookies were a little small for the marbelling to really show up on each individual one, especially with the orange and the yellow. That was the part that didn't work out as well as I had hoped. While some marbelling did show, I might as well have just stuck with half orange and half blue. C'est la vie.
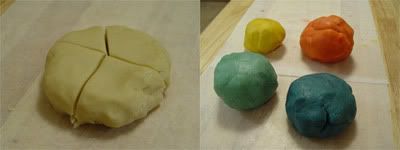
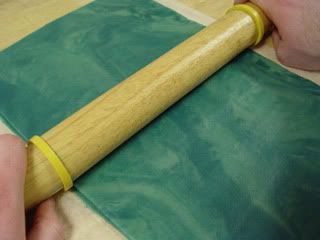
I wanted my cookie dough to be pretty much the same thickness all the way through, so as you can see in the photo, I used rolling pin spacers. In fact, I probably used the 1/8-inch spacers. The problem was, since I like to use a European-style rolling pin, the spacers were kind of close together. So as I would roll out dough and it would get too wide, I would have to cut away the excess with a pastry cutter (more commonly known in America as a pizza cutter). By the time I got to the orange dough, I got sick of the spacers and went freehand. It worked out almost as well.

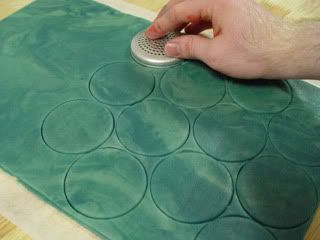
Of all my pastry tools, I still haven't bothered to buy myself a standard set of round pastry cutters. I have fluted ones, but that wasn't goind to work. Fortunately for me, I did have the lid from one of my shaker cans that was exactly the right size. The key here is to get as many cuts as possible out of one piece of cookie dough. If you cut your circles out like a chess board, you'll be wasting dough. Go for a brick-layer pattern instead.

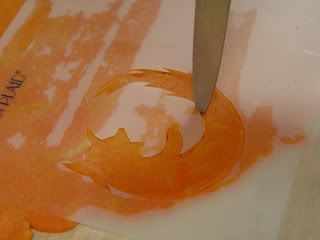
Now for the hard part. Actually, it's more tedious than difficult. You see, I don't have a Firefox cookie cutter. Yet. And even if I did, there's a lot of sharp points and curves in the fox itself. But I do have the stencil that I described above. The key is to use a paring knife like I did, or any other knife with a narrow tip. In retrospect, my boning knife probably would have been perfect. Yes, you could use an X-acto knife like I did to cut out the template. But the blade is way too sharp, and will likely start to leave nicks in the template.

You can see how the template sticks a little bit to the dough, and that's a good thing. You don't want it sliding around at all here either. You'll also notice that your cuts aren't perfect. Don't worry about it, it's not like you're painting the Sistine Chapel, and your cookies aren't going to last as long as that either.
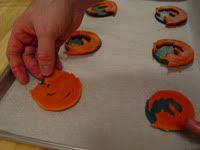
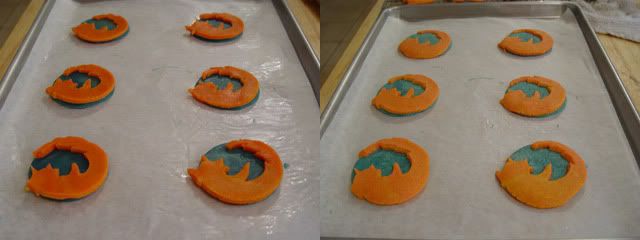
I found it easier to lay out my blue rounds on a parchment-covered sheet pan, cut out each fox individually, lift up the corner of the parchment to drop the fox upside-down onto my hand, and then flip it back onto the cookie. I also found it easier to wait until it was on the cookie to remove the center piece of dough.
When I had a full sheet of cookies, I would move it to the oven and start on the next sheet while the first was baking. I started to get pretty quick with the stencil, and by the time one sheet came out of the oven (about 10 - 12 minutes), I would already have the next ready. If I had time, I would pop the sheet into the freezer for a couple of minutes to help firm up the dough a little bit. Remember, cold dough spreads less, and this dough has a lot of detail.
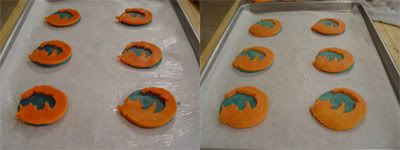
You can see that there will be a little speading, but hopefully not too much. In fact, I was surprised that mine spread so little. The sharp edges actually stayed relatively sharp. That was the part that worked out better than expected. There were a couple of nice things about the method used for these cookies, as opposed to the extrusion method used for the Ubuntu and Tux cookies. First of all, can you imagine trying to extrude the shape of the fox? And then trying to extrude a perfect fit for the globe that it was wrapped around? Good luck with that one. Cutting with the stencil may be tedius, but I would take it any day over the extruded version. Second, the fox in the logo is kind of in front of the globe. It's nice to have the same thing going on in the cookie version.
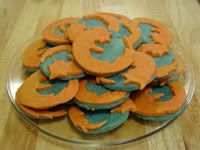
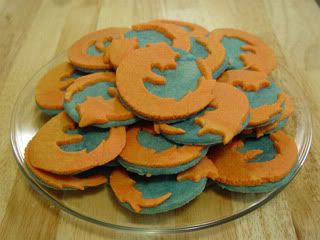
So there you have it, a plate of beautiful Firefox cookies, perfect for any holiday or geek party. Of course, you don't have to stick with a Firefox design. My intention in showing you this design is to teach you techniques that you can use for your own cookies, or even other pastries. I hope to start seeing similar cookie designs popping up on the Internet, and I hope whoever does them decides to keep the instructions open source, like I did here.
Digg This
First, I needed a template. Those of you who read my post on hippen paste may remember the template that I used for the Gnome foot. While I was working on that, I decided to get a couple more logos on there as well, just in case. One of those logos was the Firefox logo. If you look closely at the photo, you should be able to see what kind of blank template I used. I printed out just the fox, taped my blank stencil to it to make sure there was no sliding around, and then cut out the outline of the fox with an X-acto knife.
For those that are interested, I printed my logo three inches wide. With that out of the way, it was time to make the cookies. I only used one batch of sugar cookie dough, which you may remember from the Ubuntu cookies. I divided that dough in half, and then divided one of those halves in half again. The other half was divided into 1/3 and 2/3-sized pieces. The 1/3 was colored yellow, the 2/3 colored orange, and the other two pieces were colored light blue and dark blue.
The idea was to marble the colors together, in an attempt to achieve the same kind of coloring that Jon had in his logo. Unfortunately, the cookies were a little small for the marbelling to really show up on each individual one, especially with the orange and the yellow. That was the part that didn't work out as well as I had hoped. While some marbelling did show, I might as well have just stuck with half orange and half blue. C'est la vie.

I wanted my cookie dough to be pretty much the same thickness all the way through, so as you can see in the photo, I used rolling pin spacers. In fact, I probably used the 1/8-inch spacers. The problem was, since I like to use a European-style rolling pin, the spacers were kind of close together. So as I would roll out dough and it would get too wide, I would have to cut away the excess with a pastry cutter (more commonly known in America as a pizza cutter). By the time I got to the orange dough, I got sick of the spacers and went freehand. It worked out almost as well.
Of all my pastry tools, I still haven't bothered to buy myself a standard set of round pastry cutters. I have fluted ones, but that wasn't goind to work. Fortunately for me, I did have the lid from one of my shaker cans that was exactly the right size. The key here is to get as many cuts as possible out of one piece of cookie dough. If you cut your circles out like a chess board, you'll be wasting dough. Go for a brick-layer pattern instead.
Now for the hard part. Actually, it's more tedious than difficult. You see, I don't have a Firefox cookie cutter. Yet. And even if I did, there's a lot of sharp points and curves in the fox itself. But I do have the stencil that I described above. The key is to use a paring knife like I did, or any other knife with a narrow tip. In retrospect, my boning knife probably would have been perfect. Yes, you could use an X-acto knife like I did to cut out the template. But the blade is way too sharp, and will likely start to leave nicks in the template.
You can see how the template sticks a little bit to the dough, and that's a good thing. You don't want it sliding around at all here either. You'll also notice that your cuts aren't perfect. Don't worry about it, it's not like you're painting the Sistine Chapel, and your cookies aren't going to last as long as that either.
I found it easier to lay out my blue rounds on a parchment-covered sheet pan, cut out each fox individually, lift up the corner of the parchment to drop the fox upside-down onto my hand, and then flip it back onto the cookie. I also found it easier to wait until it was on the cookie to remove the center piece of dough.

When I had a full sheet of cookies, I would move it to the oven and start on the next sheet while the first was baking. I started to get pretty quick with the stencil, and by the time one sheet came out of the oven (about 10 - 12 minutes), I would already have the next ready. If I had time, I would pop the sheet into the freezer for a couple of minutes to help firm up the dough a little bit. Remember, cold dough spreads less, and this dough has a lot of detail.
You can see that there will be a little speading, but hopefully not too much. In fact, I was surprised that mine spread so little. The sharp edges actually stayed relatively sharp. That was the part that worked out better than expected. There were a couple of nice things about the method used for these cookies, as opposed to the extrusion method used for the Ubuntu and Tux cookies. First of all, can you imagine trying to extrude the shape of the fox? And then trying to extrude a perfect fit for the globe that it was wrapped around? Good luck with that one. Cutting with the stencil may be tedius, but I would take it any day over the extruded version. Second, the fox in the logo is kind of in front of the globe. It's nice to have the same thing going on in the cookie version.
So there you have it, a plate of beautiful Firefox cookies, perfect for any holiday or geek party. Of course, you don't have to stick with a Firefox design. My intention in showing you this design is to teach you techniques that you can use for your own cookies, or even other pastries. I hope to start seeing similar cookie designs popping up on the Internet, and I hope whoever does them decides to keep the instructions open source, like I did here.
Digg This
Wednesday, November 22, 2006
Chocolate Extravaganza
Did you miss the Utah Chocolate Show? Or did you go, and wish it wasn't over? Can't wait another year? Well, I have good news for you: the Chocolate Extravaganza is right around the corner.
First of all, let me take a moment to direct your attention to the announcement that I just posted over at the Utah Bakers Dozen website. I recently got an email from Star Quayle, asking for assistance in finding vendors for her Chocolate Extravaganza coming up this February. If you are a vendor in the chocolate business, you will want to give her a shout. I have posted information over at the UBD website for you to check out.
For those of you who aren't vendors, you may still be interested in this event. It will be happening Friday and Saturday, February 9th and 10th, 2007. Friday evening will be a gala dinner, with awards and entertainment. Saturday afternoon will feature a festival, jam packed with vendors (see above), chocolate, more entertainment, the works. Bonus: it's a fundraiser for Utah Valley Regional Medical Center’s Newborn Intensive Care Unit. Did you ever imagine that chocolate could make you feel so good in so many ways? Everyone mark your calendars, because this is not an event to be missed.
Tuesday, November 21, 2006
A Chocolate Story
In Raymond Lammers' classes over the weekend, he aked the classmembers what their preferred chocolates were: white, milk or dark. Each time, those who loved dark were in the majority. Raymond commented that just ten years ago, the majority would have been for milk chocolate. He theorized that this may be because dark chocolate is suddenly being revered as some sort of wonder drug. Think about it: it has antioxidants, it has endorphins, it has caffeine, and hey! Did I mention it's chocolate?
I am one of those who has migrated from milk chocolate to dark. I started to think about it this afternoon, wondering what it was that made me switch. When I was a wee lad, my parents would often buy bags of those little Hershey's Miniatures. We liked the plain Hershey's ones. My younger sister's favorite was Mr Goodbar, but mine was Krackel. But the one flavor that none of us kids liked was the Hershey's Special Dark. But that was okay, because it was apparently my mom's favorite flavor.
So how did I make the jump? It wasn't coming to me. And just as I was about to tell myself that it just kind of "happened", it hit me. One Christmas when I wasn't so young, Santa left me a bar of chocolate in my stocking from some company called "Godiva". I didn't know who these Godiva people were, but I knew expensive chocolate when I saw it, and I was excited! Well, at least I was until I took my first bite. It was bitter! It was more bitter than I thought chocolate could ever be. I could barely taste the chocolate beyond the bitter. It took me a good couple of days to finish that chocolate bar. I don't even know why I bothered trying, but I do know that by the time I was finished, I was hooked. It had gone from being the most bitter chocolate ever to the best chocolate ever. This stuff was good!
I still ate Hershey's chocolate for the next few years, along with all the other mainstream chocolates. Hershey's Special Dark was now on the list, and eventually replaced the milk chocolate stuff. The times when I could get my hands on Godiva were rare, but treasured. Eventually, mainstream chocolate lost my interest, except as a last resort when the good stuff couldn't be found.
By the time I got out of cooking school, new words had entered my vocabulary. Ghiradelli was among the first, and I prided myself on using such high-end chocolate. Scharffenberger crept in, and my beloved Guittard became the norm. In fact, aside from the occassional Nestle morsels purchased only when nothing else could be found, Ghiradelli had become my new low-end chocolate. I was searching out chocolates with labels such as "couvature" and "single-bean origin". Current favorites: E-Guittard, Callebaut and of course, Amano. I've tried Valrhona, and they don't make the list.
And so, my chocolate roots have been traced. Was my childhood experience with Hershey's largely responsible for my earlier distaste for dark chocolate? I suppose anything's possible. I'm kind of glad I'm so far ahead of the bandwagon. Sure, I was one of the first people to proclaim the virtues and health benefits of dark chocolate. Well, relay is more like it. Actually, I suppose I just used it as an excuse to try and get people to try the dark stuff. You know you love it, people. And I love it too.
Cranberry Sauce
You know what I love about cranberries? Dang near everything. A good place to start is the classic cranberry sauce. Actually, my version is more like a compote, or maybe preserves. It's not like like the stuff you serve in the shape of the can. Not that there's anything wrong with the canned jelly stuff. I grew up with it, and I still like it. But there's so much more than you can do with a good cranberry compote. Let's take a look at the following ingredients:
12 oz cranberries
1 cup granulated sugar
1 1/2 cup water
Technically, this is all you really need to make cranberry sauce. It's a simple thing. But it's kind of on the boring side, isn't it? For instance, I would never just use water. I mean, it does satisfy the physical requirements. We need something for the cranberries to boil in. But I'm the sort that has a hard time cooking with just water in general, because it adds nothing in the way of flavor. Sometimes I think it's a fault of mine. But not this time. And while we're talking about flavor, why would we just use plain old white sugar? Boring. Let's make some changes to our ingredient list:
12 oz cranberries
1/4 cup granulated sugar
1/2 cup dark brown sugar
1/4 cup real maple syrup
1/2 cup orange juice
1 cup ginger ale
This ups the ante a little, doesn't it? Cranberry is still the star of the show. But we've added some supporting actors to help out. The dark brown sugar deepens the flavor a little bit, while the maple syrup adds a little New England touch. I left the granulated sugar in to make sure we don't go too overboard. We've added a little bit of a balance to the cranberries with the orange juice, which not only adds to the fruitiness, but also accents the zing from the cranberries. The ginger ale adds a little spice to kind of bring it all together. If you want, you can even add a pinch of salt to the mix. But the ginger ale will add a tiny amount, and I don't think you need a whole lot more.
Cooking this is pretty easy too. Dump it all in a saucepan, bring it to a boil, drop it to a simmer, and keep an eye on it. I'm serious! That ginger ale still has carbonation, and it likes to fizz. All that heat is going to do is make it angry, and it will attempt to boil over the side. Don't let it. If it gets too close to the top, take it off the heat until it settles down. You're going to need to do this until it stops fizzing up. After a while, it will settle down and bubble a little. You're still stirring too, right? Well, you don't need to stir constantly, but the stuff on the bottom is going to get pretty hot, so you want to move things around on occassion to keep the bottom from burning.
After a while, you'll hear the cranberries start to pop. They have a good bit of moisture trapped inside, and you're turning each little cranberry into its own little ball of pressure. Don't worry, the popping won't hurt you unless you stand right over the pot and watch. That might be a little close. When the popping stops, you can pull out your trusty immersion blender and give it a whir if you like. If you want to get rid of the seeds and skins, you can even strain it when it's done cooking. You might want to do it while it's still warm, though.
How long do you cook it? Well, normally I would tell you to reduce it down to the desired consistency. Do that with this stuff and you may end up a pretty unhappy camper. Cranberries are loaded with pectin, and that stuff thickens as it cools. In fact, when I cook mine down, I make sure it's a little viscous, but still pourable. Move it off the heat and let it cool.
You may notice a skin forming on top. Don't worry about it, it's just from the fruit. When it's totally cooled, you can give it a stir and the skin won't really come back. It will be pretty gelled though, like preserves. And what can you do with it? What can't you do with it? Imagine this: a couple of nice, flavorful slices of sourdough bread, some romaine lettuce, a couple of slices of turkey (I like peppered turkey), a couple of nice, thick slabs of bacon, and a nice layer of cranberry sauce on the top slice of bread. Oh man. I've even added a couple of tablespoons of mustard to the sauce while it's cooking, to make cranberry mustard. Also good on a turkey sandwich. But the key to mustard is, the longer it sits, the better it tastes. Just don't let it sit for too long. A week or two is probably enough.
I've also used this stuff as a filling for pastries (without the mustard). In fact, use it for anything that you would use jam or preserves for. It has both savory and sweet aplications. I've served a thinner version before as a dipping sauce for Thanksgiving turkey. You're only limited by your own imagination.

12 oz cranberries
1 cup granulated sugar
1 1/2 cup water
Technically, this is all you really need to make cranberry sauce. It's a simple thing. But it's kind of on the boring side, isn't it? For instance, I would never just use water. I mean, it does satisfy the physical requirements. We need something for the cranberries to boil in. But I'm the sort that has a hard time cooking with just water in general, because it adds nothing in the way of flavor. Sometimes I think it's a fault of mine. But not this time. And while we're talking about flavor, why would we just use plain old white sugar? Boring. Let's make some changes to our ingredient list:
12 oz cranberries
1/4 cup granulated sugar
1/2 cup dark brown sugar
1/4 cup real maple syrup
1/2 cup orange juice
1 cup ginger ale
This ups the ante a little, doesn't it? Cranberry is still the star of the show. But we've added some supporting actors to help out. The dark brown sugar deepens the flavor a little bit, while the maple syrup adds a little New England touch. I left the granulated sugar in to make sure we don't go too overboard. We've added a little bit of a balance to the cranberries with the orange juice, which not only adds to the fruitiness, but also accents the zing from the cranberries. The ginger ale adds a little spice to kind of bring it all together. If you want, you can even add a pinch of salt to the mix. But the ginger ale will add a tiny amount, and I don't think you need a whole lot more.
Cooking this is pretty easy too. Dump it all in a saucepan, bring it to a boil, drop it to a simmer, and keep an eye on it. I'm serious! That ginger ale still has carbonation, and it likes to fizz. All that heat is going to do is make it angry, and it will attempt to boil over the side. Don't let it. If it gets too close to the top, take it off the heat until it settles down. You're going to need to do this until it stops fizzing up. After a while, it will settle down and bubble a little. You're still stirring too, right? Well, you don't need to stir constantly, but the stuff on the bottom is going to get pretty hot, so you want to move things around on occassion to keep the bottom from burning.
After a while, you'll hear the cranberries start to pop. They have a good bit of moisture trapped inside, and you're turning each little cranberry into its own little ball of pressure. Don't worry, the popping won't hurt you unless you stand right over the pot and watch. That might be a little close. When the popping stops, you can pull out your trusty immersion blender and give it a whir if you like. If you want to get rid of the seeds and skins, you can even strain it when it's done cooking. You might want to do it while it's still warm, though.
How long do you cook it? Well, normally I would tell you to reduce it down to the desired consistency. Do that with this stuff and you may end up a pretty unhappy camper. Cranberries are loaded with pectin, and that stuff thickens as it cools. In fact, when I cook mine down, I make sure it's a little viscous, but still pourable. Move it off the heat and let it cool.
You may notice a skin forming on top. Don't worry about it, it's just from the fruit. When it's totally cooled, you can give it a stir and the skin won't really come back. It will be pretty gelled though, like preserves. And what can you do with it? What can't you do with it? Imagine this: a couple of nice, flavorful slices of sourdough bread, some romaine lettuce, a couple of slices of turkey (I like peppered turkey), a couple of nice, thick slabs of bacon, and a nice layer of cranberry sauce on the top slice of bread. Oh man. I've even added a couple of tablespoons of mustard to the sauce while it's cooking, to make cranberry mustard. Also good on a turkey sandwich. But the key to mustard is, the longer it sits, the better it tastes. Just don't let it sit for too long. A week or two is probably enough.
I've also used this stuff as a filling for pastries (without the mustard). In fact, use it for anything that you would use jam or preserves for. It has both savory and sweet aplications. I've served a thinner version before as a dipping sauce for Thanksgiving turkey. You're only limited by your own imagination.

Monday, November 20, 2006
Ubuntu Hacks
I have recently been reading a book called Ubuntu Hacks by Jonathan Oxer, Kyle Rankin & Bill Childers, published by O'Reilly and Associates. If you don't know by now, Ubuntu is my Linux distribution of choice, but I'm not completely up to speed on getting the most out of it. It's certainly much easier to use than Windows ever was for me, but that doesn't mean it's not without its faults and pitfalls. I didn't expect to become a Grand Ubuntu Master by reading a single book, but I was hoping to pick up a few tips and tricks. As much as I love O'Reilly, I felt that if I didn't provide a completely objective review, I would be performing a disservice to the publisher, the authors, and anyone that read my review.
For those not familiar with Hacks series by O'Reilly, let me get you a little up to speed. Each book is a collection of 100 tips and tricks pertaining to a particular subject. The subject is divided into categories, and each category is presented as a chapter. Ubuntu Hacks covers everything from getting started (the basics) to multimedia to security. It's designed to appeal to users of all skill levels, beginners and superusers alike. Much of the text in the book is actually user-submitted, from message forums, mailing lists and the like. This being the case, the writing style often changes mid-hack. It was a little disconcerting at first, but I got used to it.
It starts even before installation. I was already familiar with Ubuntu's Live CD, which allows you to test-drive the operating system without actually installing it. This practice started with distros such as Knoppix, and has recently gained popularity. What I didn't know was how Ubuntu managed to retain user settings without ever writing to the hard drive (Hack #3). The book moved onto creating your own Live CD (Hack #4), which was another area I was completely unaware of. Once you've decided to actually install Ubuntu, it walks you through installation in a very friendly manner. But it's not all sunshine and lollipops.
While some of the tips are very friendly and simple. By the time you get to Hack #4, you'd better be comfortable with the command line, or get ready to do so. I found myself going from basic skill level to advanced, friendly to intimidating, several times a chapter. By the time I hit the Mac hacks, I was tempted to skip entire pages that I just didn't want to deal with. Much of the time I read, I wasn't at my computer. After some time, I realized that I just wasn't going to understand what they were talking about with some of the hacks until I turned on my Ubuntu box and started following along with a few hacks.
I use my notebook both at home and at work. Each network has its own settings, and I've long-since given up trying to use Ubuntu's built-in network program to switch between the two. In fact, I've written a couple of scripts to switch between network configurations for me. So I got a little excited when I found hacks 42 and 43, which deal with this sort of thing. Sadly, there were problems with both. Hack #42 recommended I use apt-get to install network-manager-gnome, which ended up not existing. The correct package name was "network-manager". Once installed, it was supposed to add an icon, which I never found. But I did notice that the network icons that I already had next to my clock would show me as disconnecting for a few seconds and then reconnecting on a regular basis, until I finally removed network-manager. Hack #43 had me installing laptop-net, and then hacking scripts to make it work. I very quickly decided that it was less effort to just run my own scripts then to try and get either of these hacks working. I removed the packages, rebooted (why did I have to reboot in Linux? It was eerily reminiscent of Windows), and my system was happy again.
By the time I got half-way through the book, I had realized a few things about. First of all, as with any evolving environment, Ubuntu changes a lot. What may have been true when the book was written may not necessarily be true by the time you get to it, even if you're running the same version as the author. Also, as objective as the authors may try to be, I believe biases still exist, that may even be invisible to the authors themselves. What I'm getting at is, take everything with a grain of salt. Just because they give you a tip that they find to be extremely helpful for them, doesn't mean it's going to be worth as much to you, if anything.
If you're new to Linux, I would highly recommend checking out Ubuntu Linux. If you want to really get to know Ubuntu, then you should grab a copy of this book and follow the bouncing dot. Walking through several of the hacks in the book will teach you a great many things about the Linux operating system in general. Having read this book and followed some of the examples in it, you will easily be able to switch between flavors of Linux. Even Debian Linux will seem a lot easier to you than it might have beforehand. SuSE will be second nature to you. Red Hat will be a snap. It may be a while before you can handle Gentoo, but milk before meat, right?
I've read many an O'Reilly book in my time, and this one certainly didn't make it to the top ten. But it's far from being the worst one either. It's certainly better than one of those yellow and black books, that assumes you to be some sort of dummy merely by virtue of purchasing the book. It won't treat you like an idiot, but you may feel a little like one when you hit the heavy stuff. Don't worry, Kindergarten wasn't always a piece of cake either. But you survived that, and now just about everything you learned there you probably take for granted now. With the help of this book, you'll soon be taking much of Linux for granted too.
Sunday, November 19, 2006
Advice for Vendors
Today I was going through all of the brochures and such from the chocolate show, and thinking about some of the vendors I met with. When the show opened, I started by visiting every booth. Well, almost every both. Having done that, and later looked through the literature, I have come up with some observations and advice that I think may benefit vendors at all future trade shows, both food related and otherwise.
Bring Handouts
I'm not talking about things like samples. I'm talking about anything, be it a photocopied sheet of paper or a full-color brochure, that you can hand out to your visitors that explains the key items that you would like them to be familiar with, gives appropriate company and contact information, and maybe even lists references for the potential customer to research, such as your company website. I don't even know how many booths I visited that may have had a quality product, which I will never remember beyond the sample of chocolate that I tasted while trying to focus on fifty other things. If you can't be bothered to photocopy something, then at least bring a stack of business cards.
Put Some Effort Into Your Handouts
I have a price list sitting next to me for "Seven Component Trays" from, well, I don't know who. On the bottom it says, "Orders: Sharon" and lists a phone number. At the top it has the words, "Price List" printed on top of a very festive-looking snowman, which is dark enough to make it hard to read the text on top of it. I don't know that I'm even going to bother looking at the price list now, because it would do me little good anyway. Had they bothered to put a company name on the sheet, I would have been several times more likely to call "Sharon", whoever that is. If they can't be bothered to do the handout right, how do I know they'll bother with doing anything else right either?
Hand Out Your Handouts
One booth had some very nice chocolates, which I was interested in. I could see that the man at the booth had a price sheet behind the counter, so I asked for a copy. He gave me an almost blank stare and asked, "what price list?" I pointed at the stack sitting in front of him, not two inches away from him and said, "that price list." He looked surprised as he looked down at the list and said something that could have been, "oh, of course" (but probably wasn't), and handed me a sheet. The product was good, so I may still order some. But I worry that working with them will be a chore.
Be Useful to Guests
There was a cruiseliner booth. There was a booth handing out free newspapers. A local TV station had a booth that seemed to have nothing more going than a drawing for a giftbasket. One booth seemed to be selling excercise equipment, and another was advertising "spinal decompression" procedures. I did not visit these booths. If I really was in the market for a newspaper subscription, I'm afraid a chocolate show is the last place I would be shopping for one. Ditto for doctors. If it wasn't bad enough that I found these booths useless, somebody I spoke with after the show seemed surprised that there were so many booths that had nothing to do with chocolate. As somebody with a vested interest in such shows, she was the last person who I would want thinking that.
Be Friendly to Guests
As I was mainly interested in booths that had liturature for me, I gravitated towards a stack of catalogs at the Winder Farms booth. The nearest rep at their booth came over and greeted me. He asked me questions, such as whether I'd heard of them, and what sorts of things I was interested in from them. He showed me a few products, and was a little surprised to discover that a) I used to live within minutes of their main farm, b) I also used to live down the road from a New Hampshire supplier of theirs and c) I currently live within minutes of their Orem location. These are not things I normally tell salespeople because, as you probably know by now, I generally hate salespeople. This man didn't act like a salesperson, he acted like a company representative. He didn't try to push me into buying anything, and when he offered me a sample of their chocolate milk, I didn't feel like he was preying on me. I gave him my card, and he wrote his name and number on the catalog. I plan to check out their store this week.
Show Off Your Wares
This one wasn't bad at this show. Almost every booth had samples at it. These people were ready and willing to demonstrate to me what I would never be able to experience on their website: what their product was really like. Of course, this did mean that I found out for certain with some products that I would never want to spend any money on them. But it also let me know with other products that I was interested. A company called Utah Truffles came out to the line waiting for the show to open, to offer a couple of different flavors of truffles to the waiting guests. When I reached their booth, they had several other flavors available, and I now have their brochure and business card to let me know what else they offer, and how to buy from them. There's a good chance I will, too.
Become Involved
The previous tip was a good example of this. Utah Truffles involved themselves at the beginning of the show. Amano Chocolates was one of several booths featured on Fox 13 News on Friday morning. In fact, Amano actually brought a piece of equipment from their chocolate factory to the show, and had it working during the show. I walked by their booth several times, and there were always people there looking at the machine and talking to the owners. And who could have been more involved than Callebaut Chocolate? Their chocolate was featured prominently in Raymond Lammers classes, especially in the chocolate tasting at the end of the show. It was because of them that the chocolate tasting was able to happen, even though they certainly weren't the only brand featured. These are all companies that I hope to deal with in the future.
These were just a few things that I noticed during the chocolate show. I'm sure there were several others that I didn't pick up. I hope my advice and observations help out somebody, and doesn't just look like me ranting.
Saturday, November 18, 2006
Utah Chocolate Show Report: Day 2
I just got back from the second day of the Utah Chocolate Show, and boy was that awesome. I spent almost no time on the floor today. In fact, I spent almost the entire day in Lab A, either taking classes or helping out with them.
I started the morning at around 9:30, helping Chef Raymond Lammers set up for his second chocolate showpiece class. His assistant yesterday did next to nothing, but he wasn't about to let me get away with that today. He told me that he planned to use me a lot more today, and he sure did.
I started by drying the dishes he had just washed, and before long I was cleaning out chocolate molds. I felt a little like an apprentice, peeling potatoes. That's okay, I was just ecstatic to be there. When the class started, he let me know that after he demonstrated each technique, he would hand it off to me to finish up anything that was left with that technique. He had me filling tubes with chocolate, brushing colored cocoa butter on acetate sheets, and cutting half-dried chocolate sheets into long triangles. As he built the various components and started assembling them into a showpiece, I got to work the freeze spray.
Freeze spray is awesome. It's just like the compressed air that you use to spray the dust out of your computer, except that it's food-safe. The computer stuff is made from recycled air. The food-grade stuff is a lot cleaner. It's useful for sugar and chocolate alike. When you attach two pieces of chocolate or melted sugar, you have the option of either standing there for half an hour, waiting for the pieces to set, or you can spray it with freeze spray and be able to move on in a matter of seconds. Of course, it gets a little cold for the digits holding the pieces in place, in this case, Raymond's fingers. But as he said, "that's okay, you get used to it."
Something I noticed was that a lot of people in today's classes were more interested in the basic composition and physics of chocolate, whereas yesterday's class seemed more interested in the artistic and structural information. I quickly realized that there seems to be a lack of public understanding of what pastry chefs consider to be the basics. I'm thinking I may write up something to explain it a little better. Hey, maybe you'll see me teaching a class next year, who knows?
I ended up getting suckered into helping out with the free Candymaking class too, which was packed. I got to hand out a lot of samples, of candied almonds, hot fudge with vanilla ice cream, things like that. Fortunately, I was still able to just sit and enjoy Ruth Kendrick's advanced candymaking class. As it turns out, it was the same class I helped her out with a couple of years ago at the Orson Gygi Culinary Center, so she didn't really cover a whole lot of content that was new to me. But it was my first break all day, so it was still nice.
My day at the show ended with a chocolate tasting, also run by Chef Lammers. Almost all of our chocolate was either Callebaut or Felchlin (don't worry, I've never heard of Felchlin either). Some of it was really good, some of it was so-so, and some of it barely tasted like chocolate at all. A couple of the single-bean varieties were described by a couple of class members as tasting "like dirt". Personally, I thought one of those two was slightly fruity, but they both had a lousy finish. I was pretty impressed with Callebaut's honey milk chocolate. It had a little of that honey aftertaste we're so familiar with, but it wasn't bad. In fact, I managed to con Raymond into letting me steal a small cup of pieces after the tasting. I also managed to score some little pieces of Callebaut that were like little M&M-sized marblings of white and dark chocolate.
This was a good chocolate show. I'm looking forward to next year, and I'm already trying to figure out how to con the director of the show into letting me participate more next year. Utah's chocolate community is growing stronger. It's an exciting time to be here.
Friday, November 17, 2006
Utah Chocolate Show Report: Day 1
Normally when I get up in the morning, I'm out the door and on my way to work well before my wife turns on Fox 13 News to start her day. This morning I got to sleep in a little bit, since I was going to the chocolate show instead. Imagine my surprise when the famous "Big Buddha" suddenly appeared on our TV, standing next to Art Pollard of Amano Artisan Chocolate, at the Utah Chocolate Show. Art did well for his first TV appearance. He was concise and to the point, which is good for TV. I was a little worried that he was going to delve into a lot of detail like he does when he talks to me. It's the sort of thing I thrive on, but not so good for a 60-second news clip.
And thus began the Utah Chocolate Show. I was a little disappointed, but not incredibly surprised when I realized that this was a consumer show. It wasn't quite the kind of trade show that I was used to in the tech industry. Sure, there was chocolate. There were even a couple of wholesalers, and I made sure to get their business cards. But there were a lot of businesses there that didn't even have anything to do with chocolate. The News Agency Corp was there, trying (unsuccessfully, as near as I could tell) to get people to take a free newspaper. I suspect most of the people there had already read that very same newspaper that morning. There was a massage booth. There was some sort of spinal decompression something-or-other. There was something about a free cruise or something.
Fortunately, most of the vendors were chocolate vendors. It wouldn't be much of a chocolate show otherwise, would it? I sampled some sort of "frozen hot chocolate" thing (it was okay, but watery-tasting), some sugar-free energy chocolate (it tasted vaguely chalkily medicinal) and some sort of healthy, organic dark chocolate (surprisingly fruity notes with a pleasant aftertaste, but too high of a melting point to really dissolve on my tongue properly). I tasted toffees, caramels, truffles, chocolate milk, all sorts of goodies. I was somewhat dismayed to note that certain local purveyors weren't there, such as Liberty Hieghts Fresh, Pirate O's and even Bakers C&C. Hopefully we'll see them next year.
I spent most of the day in classes. I signed up for them all. I started with the "Fondants and Centers" class, taught by four delightful women who apparently learned from the great Pauline Atkinson herself. They made frequent, almost reverent reference to Pauline's book Candymaking, and occassionally mentioned Ruth Kendrick, Pauline's daughter who co-authored the book and who was teaching the advanced class next door. I would later take the Beginning Chocolate Dipping class from these same four ladies. Man, I need practice.
I ended my day with the Chocolate Showpieces Made Easy class with Raymond Lammers. This guy is fun to watch, and to listen to. I learned a lot from him, much of which I hope to dispense on this blog in the very future. For those of you in the area who have $95 handy and tomorrow morning free, he will be teaching one more class at 10am. Just before I left the show, I spoke with Melanie Henderson, who is the director of the show, and volunteered to help with any of tomorrow's events. She assigned me to be Raymond's assistant for tomorrow morning's class, so I get to see it again. I'm looking forward to it.
Non-Food/Non-Tech Post: The Office
It's been a while since I've had anything to post, which makes me antsy. While I will have things to post this weekend, mainly reviews from the chocolate show, I still feel the need to post this morning, about something that's been on my mind all night. Well, during the parts that I was awake. I'm a chronic insomniac, so there were a few.
I'm a big fan of a show on NBC called The Office. Part of the reason I like it is because it's funny, but unlike other shows, there's no laugh track to help you know when to laugh. You have to figure it out yourself. I also like it because it reminds me of so many offices that I have worked in, and even of the office that I work in now. Because of that, it tends to get uncomfortable at times, so much so that I even have a hard time looking at the picture on occassion. It's just a little too close to reality.
Last night, once of the characters was asked to shred a box of papers from another office branch that had just closed. He was pretty excited about it. He went on about how cool the shredder was. "Look! It can even shred a CD! It can even shred a credit card! Uh oh..." I was sitting there thinking it would choke on the CD, but it didn't. It ripped right through that thing. I was caught up in his excitement, mostly laughing at it. A few minutes later, they cut to a commercial break, which started with an ad from Staples. Halfway through the ad they showed a shredder, and I said to my wife, "hey look, it's the same shredder as Kevin had." My wife replied, "yeah, I saw it at Staples the other day. It said, 'as seen on The Office' next to it." And then it hit me. They had just pulled the most cunning product placement I had seen in a long time. I was already impressed with Kevin's shredder, because it could shred a CD. My own shredder at home stopped working a couple of months ago when I tried to feed it ten pages at once. And look! Staples has that same shredder! It wouldn't die if I fed it ten pages at once.
This morning, I woke up early. I do that a lot. While I was laying there trying to convince my brain to go to sleep, something occurred to me. On last week's episode of The Office, the boss of the other office had left for a job at Staples. And some episodes before that, a group of characters on the show had been at a paper convention, and one of them had set up a deal with a particular paper company who's products had previously been available exclusively to Staples. When they do things like that, I often idly wonder if they just used Staples because it's a highly recognizable name, and if Staples was going to get mad at them for not asking permission first.
Suddenly with the shredder, I realized why they had been mentioning Staples so much on The Office. Product placement. It's subtle. It's almost subliminal. And I would even go far as to say it's effective. I still want that shredder. I don't know that I'm that much more likely to go to Staples in general, though. I have an Office Max and an Office Depot right down the street from me, and I still generally drive the extra distance to Staples anyway.
It didn't stop there. I never had the chance previously to watch 30 Rock, because it aired on Tuesdays. I'd always been curious, because I liked Tina Fey on Saturday Night Live. They've just 30 Rock it to Thursdays, so we thought we'd give it a shot. The basis of the episode was product placement. Everyone was mad that the big boss wanted them to write a comedy sketch with product placement in it. They then proceeded to liberally and obviously endorse Snapple, much the same way we saw in Wayne's World. "I can't believe you're making us write a product placement sketch, but we sure do love this Snapple!" On a side note, I liked the episode. I'm only a little bummed that 30 Rock won't be airing immediately after The Office, and that I'll have to find something else to occupy my time while Scrubs is on.
Anyway, that episode of 30 Rock brought to mind what I frequently think about when I see product placement like that. I tend to think that a lot of people get pretty unhappy when they see that happening. It don't mind so much. It fascinates me. We've been seeing it in movies for years, so it was only a matter of time before we got to see this level on TV.
Well, I'd love to chat, but I'm running out of pens and I'm pretty thirsty. I'm going to head on over to Staples, and maybe pick up a Snapple on the way. I'll see you all later, after the chocolate show.
(This article not paid for by or affiliated in any way with Staples, Snapple, NBC or their affiliates, or the Utah Chocolate Show.)
Sunday, November 12, 2006
Gingerbread House Festival Report
My wife and I went to the Gingerbread House Festival yesterday morning. I decided that it would be best to go early to beat the crowds, and I'm glad I did. It was relatively empty when we got there, but it quickly filled up with little kids accidentally running into my pregnant wife and almost knocking her over, and parents who didn't seem to care how recklessly their kids ran around.
Entering the show, we were greeted by a scoutmaster-looking fellow and a woman at a table, who took our tickets and gave us programs. When I first posted about the festival a few days ago, I had emailed one of the people in charge and asked about getting email notifications next year. He had told me that there would be a signup list at the door. As it turns out, the signup "list" was actually a form that I have to mail in somewhere.
The people at the table told us that there were activities all around, such as puzzles and places where you could build your own gingerbread house. Since we had come to look at already built-houses, we thanked them and moved on. Immediately behind them was the second-place winner: a gingerbread recreation of the Hogwart School from the Harry Potter books. It was magnificiently done. I began to think that perhaps my expectations of the Utah festival had been much too low. Then I saw the first place winner to the right of the second place one. It was wider than the other one, but not nearly as tall, nor nearly as realistic. It was a house, with poured sugar windows on two sides, and open windows on the other two sides so that you could see into the house. I would say there was a higher percentage of detail inside the house than outside. In fact, if they had included as much detail on the outside, I would probably not have been disappointed that it beat out Hogwarts.


The rest of the gingerbread houses were in a seperate area, so we went over to take a look at them. I was kicking myself the whole time for forgetting my regular camera, but fortunately I had my Clie with me, which has a camera built-in. Sadly, the camera on that has been on the fritz lately, and I only managed to photograph about 2/3 of the houses before it fuzzed out on me.
Apparently there were multiple categories, because I saw at least one more second-place ribbon at the "normal" gingerbread houses. There were some excellent ones there, and there were some that were obviously built from kits. In fact, I saw at least two different kits represented there multiple times each. Most of the houses looked like they had been built from scratch. A favorite of mine was a Halloween gingerbread house, made with Halloween candy. I was disappointed to see that at least two people decided to build BYU and U of U (University of Utah) houses next to each other. It's an old cliche in Utah. We saw gingerbread trains, we saw somewhat elaborate houses, and we even saw an igloo with penguins made out of store-bought chocolate-covered cookies. Unfortunately, my camera died two houses before that one or else I would post a picture of it.
As we walked through the festival, we got to listen to bad Christmas music, as I'm sure we will be doing for the next month and a half. It was easy enough to ignore, until somebody decided that they weren't happy with the volume level. In fact, they didn't seem happy with any particular volume level, because the last 10 - 15 minutes we were there, it was constantly being played with, almost as if some kid got into the sound equipment and decided it was a game.
When we first entered, a girl walked up to us and offered us chocolate-covered popcorn. Since it wasn't likely to be that icky artificial butter-flavored microwave crap, I tried one. It wasn't bad. There was also another girl walking around with caramel popcorn, but she seemed more interested in flirting with the boys that looked like they were supposed to be there, but didn't seem to have a purpose in doing so, other than flirting with the popcorn girls.
I complain a lot. Really, it was a good time. $3 for something like that isn't bad, and my only real disappointment was in forgetting my real camera. I'm glad I found out about the show, even if it was just in time. To the organizers: I'm not sure if you advertised, but if you did, it wasn't where I would have seen or heard about it. Next year you might want to work a few more angles, such as the food bloggers (like myself) in Utah, or perhaps some of the cooking/baking ground around, such as the Utah Bakers Dozen. This is what's known in the biz as "free advertising".
I'll be keeping an eye out for the show next year, and hopefully I'll be able to give you all a little more warning. I would love to see this show get as big as the one in North Carolina that always seems to have Food Network cameras at it lately. Even if it doesn't, it's still a fun show to go to.
Saturday, November 11, 2006
Hippen Paste
I hadn't played around with hippen paste for a couple of years, so I thought I'd get myself back up to speed. What is hippen paste, you might ask? Well, it's a wafer that's kind of like a fortune cookie, but a thinner and a little better tasting. But of course I couldn't just make a plain old hippen paste wafer. I decided to play a little bit. Today's open source logo of choice was Gnome. And yes, I got permission this time. Many thanks to Máirín Duffy for that.
Here are the basics of hippen paste, in a nutshell. First, you make a paste. Then you spread it over a really thin stencil, onto a sheet of Silpat. Then you remove the stencil, toss the Silpat in the oven and bake it for a few minutes. Pull it, scrape the wafer away from the Silpat, bake it for a couple more minutes, shape it if you so desire, and let it cool. Okay, so that may have been a little much to take in all at once. Let's start from the very beginning.
First things first, I needed a stencil. My local crafty-type store sells these handy dandy little blank stencils. It's just a thin sheet of plastic that you cut out yourself. Unfortunately, I didn't think to take pictures of me cutting out the Gnome logo from the blank stencil sheet. I will tell you though that I cut the logo out about three inches wide. Don't worry, it's easy stuff, you can figure it out.
Now that we have a stencil, we can make the hippen paste itself. The recipe that I played with called for the following ingredients:
8 oz all-purpose flour
8 oz powdered sugar
4 1/2 oz egg whites
1 1/2 oz milk
Sift together the flour and sugar. This part is very important; you don't want lumps in your batter. Then whisk together the egg whites and milk, and slowly add in the flour/sugar mixture. Make sure it's thoroughly mixed, and then let rest for at least half an hour. While you're at it, you may want to divide your mixture in half and add enough cocoa powder to one half to give it a different color. You can probably add food coloring instead, but make sure it's powdered, not liquid- or oil-based. You'll be unhappy if it gets too wet.
While your paste is resting, go ahead and turn get the oven preheated to 350F. After half an hour, you can get started with the paste. Lay down your stencil on your Silpat. Don't use parchment paper! Take a little offset spatula and spread on a thin layer of chocolate hippen paste.

Move your stencil over and do the same next to the first one. You probably don't want to deal with more than six wafers at once.

Move the Silpat to the freezer. We want to get this stuff set up and solid before we do anything else. I gave mine about 15 minutes. With this next part, you'll need to work quickly, because the paste will thaw quicker than you'd think. Spread out some of the paste on the frozen chocolate part. The first couple of wafers I tried using another stencil, but that didn't end up working well. Just try to get the plain paste as round as possible. Make sure it's thin too. The thicker it is, the harder it is to bake without burning the edges.
By the time you get done, the chocolate will probably be thawed. Just in case, you might want to let it sit at room tempurature for a few more minutes. Then go ahead and toss it in that 350F oven. You'll want to bake it until it just starts to get brown around the edges. This usually takes me about 8 minutes, give or take. Then pull it from the oven and use a large offset spatula to scrape the wafers away from the Silpat. If you used parchment paper for this, you're about to find out why I told you to use Silpat instead. It doesn't release from parchment very well.

Toss it back in the oven for another 2 minutes, or until the wafers are golden brown. This is another part where you're going to need to work quickly. As soon as you pull the pan from the oven, you need to get any wafer shaping done immediately. In fact, as soon as a wafer leaves the Silpat, you have only a few seconds to shape it before it gets brittle. While the wafers are on the Silpat, you have somewhere around a minute to a minute and a half to shape them. This is the biggest reason why you usually want to stick with only 6 at a time. I decided to shape some of my wafers by placing them over a spice tin.

This forms the wafer into a kind of cup, that you can then fill with all sorts of goodies: mousse, berries, that sort of thing. Just remember, it will get soggy easily, so don't fill it until just before you serve it. I realized while my wafers were in the oven that I had actually spread out my Gnome logo so that it would end up backwards. Keep in mind that if you go for the two-color approach like I did, the bottom of the wafer will be the part you look at, not the top. So in the best interest of keeping the Gnome logo looking right, I reversed the next image:

I had a little chocolate hippen paste left over, so I decided to demonstrate one more technique. Spread out a long band of hippen paste, and toss it in the oven. Bake it as you would normally, including scraping it away from the Silpat and baking for another couple of minutes.

When it comes out the second time, hurry and wrap it around something round. Mine was big enough that I just wrapped it around my rolling pin. Normally you would probably do a smaller band, and then wrap it around the handle of a wooden spoon or something. Again, work quickly because you only have a few precious seconds before it snaps from trying to form it.

When it's cooled, go ahead and pull it off of the rolling pin, wooden spoon or whatever you formed it around.

Here's the thing about hippen paste. It's not really the sort of thing that you would serve by itself. You wouldn't just pull out a plate full of Christmas hippen wafers when family or friends show up. Well, you could, but it might be a little odd. This stuff is really good for garnish. If you do the little twist around the wooden spoon, then you can lay it up against a plated dessert. If you did the cup, you can fill it with something. It'll take some experimentation, but you'll be able to figure out a few uses for it after a while. Heck, you could probably even make fortune cookies. It's your call.
Thursday, November 9, 2006
Chocolate and Gingerbread
Two years ago, I remember hearing about some kind of gingerbread house show in Utah, right after it happened. Last December I tried looking for it again, and I couldn't find anything about it. And this year... well, this year I managed to find it just in time. The Gingerbread House Festival will be held this weekend at Thanksgiving Point in Lehi, Utah. It's too late to enter a house (which is too bad, because I would have tried to build one otherwise), but it's not to late to just go, and take a look around. According to the article that I read, admission is only $3 (or $2 for children). I'm going to drag my wife over there on Saturday morning and take a look around.
Fortunately, I had plenty of warning for the Utah Chocolate Show, which is happening next weekend. I even had plenty of time to build a chocolate showpiece for it, since I was told about it back in June. Unfortunately, I don't know how to build a chocolate showpiece. I still can't temper chocolate properly. Luckily for me, one of the classes offered this year is Chocolate Showpieces Made Easy, taught by Chef Raymond Lammers. Chef Lammers is the pastry chef at the Stein Eriksen Lodge in Park City, UT and reportedly a member of the US Pastry Team. I've been to a demonstration by him before, and he's fun to watch and to learn from. If all goes well, then maybe I will be able to submit a showpiece for next year's show.
Are there any other significant culinary events coming up in the Greater Salt Lake area that I might be missing out on? I would love to hear about them. Send an email to joseph at thatworks dot com and we'll see if I can make it.
Wednesday, November 8, 2006
Tux Cookies
Remember in my last post when I emphasized how important simplicity is to sugar cookie designs? This was a lesson learned the hard way. Before I even tried to make my Ubuntu cookies, I tried to make Tux cookies.
The concept seemed solid enough. I knew I couldn't put as much detail as I wanted to. Like the Tux Cake, I needed to break the design down into more primitive shapes. However, the shapes would be different than their 3D brethren. In the case of the cake, I needed to create a bowling pin shape, and then attach eyes, feet, wings, a beak and a chest. This was almost what was needed, except that each primitive needed to be an extruded version of the 2D shape. I would need the following shapes:
2 webbed feet (yellow)
1 beak (yellow, with a black smile if possible)
2 eyes (black with white around them)
2 wings (black)
1 chest (white), with slots for the wings
outer black color
outer white color, around the black
The first five components, once extruded into logs, would need to be carefully attached. The black color would be used partly as spackle, to make everything stick and partly as the actual black part of Tux.
The dough was made, as per the dough used for the Ubuntu cookies. A small part was set aside and colored with a bit of yellow. About two to three times that that was set aside and colored with a bit of black color left over from the Tux cake. The last bit of dough (about twice as much as the black) was left plain.
I started with the feet and beak. I rolled out two logs of yellow dough, and then pressed them at an angle with my board scraper. Then I took a toothpick and cut two notches in the short side. They actually looked like extruded feet. These were moved to the freezer. The remaining yellow was also rolled into a log, pressed a little flat, and then cut the long way down the center. This was also moved to the freezer. Finally, a very thin piece of black was rolled out into a long, flat strip about the width of the beak. I sandwiched that strip of black between the two pieces that had been cut in half. They had spent a few minutes in the freezer, so they were a little harder. With the beak finished, I tossed it back in.

Onto the eyes. I rolled out two very small logs of black. These were chilled for a few minutes while I rolled out two very flat strips of plain dough. I removed the black logs from the freezer and rolled the flat strips around them, trying to keep one end open to attach to the beak. I didn't know it at the time, but this would largely result in failure.

I moved the eyes to the freezer and moved onto the wings. These were black logs that were once again flattened and formed with my board scraper. Of course, these were also moved into the freezer. Then I moved onto the chest. This was a somewhat thick log of plain dough, and having been worked a little, was fairly pliable. I formed deep notches into it, and then plugged the wings into the notches. This was much easier than it sounds, because the wings were already pretty solid from the freezer.

While I was at it, I stuck the frozen webbed feet into the bottom of the chest. I also stuck the beak into the chest, and the eyes to the beak. This was when I started using black dough to spackle in between everything. I was mostly successful in eliminating any air pockets. I would frequently have to move everything back into the freezer to let it all get chilled again, so that it wouldn't fall apart on me.

With all of the black in place and thoroughly chilled, I rolled the whole thing in the remaining plain cookie dough. I had been hoping to get a more circular pattern, but at this point, I was running out of dough and patience. Looking at the end of my log, I saw what looked kind of, sort of like Tux... if you squint a little, and maybe turn the lights down low.

I learned a lot from these cookies. Much of what I learned was immediately applied to the Ubuntu cookies, which were actually made after these. That information is all in the Ubuntu cookies article. I also learned a little from these when I baked them, which was done after the Ubuntu cookies were baked. These cookies were smaller, and only baked for 9 minutes. I pulled them before the edges got browned, and so instead of being crispy, they were soft and chewy. It's up to you which one you like, but either one can be acheived with exactly the same recipe.
In the unlikely event that somebody else is crazy enough to attempt these cookies, please let me know how they turned out. As you can see, the Tux in my cookies doesn't look incredibly pleased to be there. That's probably not entirely because his beak somehow ended up sideways. Good luck in your own endeavors, I hope the spirit of Tuxmas blesses you more than it did me.

Tuesday, November 7, 2006
Sugar Cookies
Sugar cookies are an interesting thing. The dough is what's known as a short dough. I'd always wondered what was meant by "short dough" until I learned where shortening comes from. It's a classic battle of fat and water. For the unindoctrinated, wheat flour contains two proteins: gliadin and glutenin. When these two proteins get together and get wet, they turn into gluten. And the more gluten is worked (via mixing, kneading, etc), the more elastic it gets, which of course makes it chewier. This is definitely a good thing for bread, especially my favorite, sourdough bread. This is also a very bad thing for something like cake. The more protein a flour has, the more gluten can be formed with it, and the longer those gluten strands can be. This is why bread flour has a lot of protein (usually somewhere around 12-13%), and cake flour has very little (somewhere around 7-8%). In the middle, we have all-purpose flour, which is closer to 10-11%.
The interesting thing is, gluten has a hard time developing in the presence of fat. The fat actually shortens the gluten strands. This is where vegetable shortening gets its name: it's frequently used in short doughs. In truth, butter, margarine and any other fat can do the same thing. And might I note, butter tastes a lot better than shortening. Because sugar cookie dough is so short, it can actually be worked like playdough. It can also be colored like playdough. And unlike playdough, it can even be flavored. And so without further ado, I present the ingredients:
1 1/2 cups unsalted butter, softened
2 cups granulated sugar
2 eggs
2 teaspoons vanilla
2 cups all-purpose flour
1 teaspoon baking powder
If you remember the creaming method from our chocolate chip cookies, then you know how to put this together: cream together the butter and sugar, slowly add the eggs and vanilla, and then whisk together the flour and baking powder before adding it as well. When it all comes together, wrap it in plastic wrap and toss it in the fridge for a couple of hours. I wondered once if chilling the dough really mattered. After my first attempt to work it before chilling it, I decided that it did matter, so don't skip this step. You can knead it later to make it pliable again.
You may notice that this is not a very wet dough. In fact, it's a good deal drier than the chocolate chip cookie dough. That's okay, because chocolate chip cookies only get to be scooped. These cookies get to be formed. In fact, they get to be rolled and formed into logs, chilled again, and then sliced into cookies. In fact, this form of sugar cookie is called a "refrigerator cookie" or "icebox cookie" for this very reason.
I have seen a couple different classic patterns with this type of dough. Both involve cutting the dough in half and giving each half a different color and flavor. Then you can roll each color out seperately into long little rectangles, lay one color on top of the other, and then roll those together lengthwise so that they form spirals when cut. Or you can form each color into a square log, cut lengthwise into smaller square logs, and then put those all together in a checkerboard pattern. Both are very popular designs. But who am I to conform?
It doesn't really surprise me that the best Linux distribution also has the logo that translates into the best sugar cookie. Let's face it: Ubuntu is one sweet distro. I apologize now to Canonical Ltd. for unauthorized use of their logo. Let's hope that in the spirit of Ubuntu, they will be as awesome in their forgiveness as they are in their flavor of Linux.
There are a couple of things to remember when forming a design with a log of sugar cookie dough. You will be breaking your design into shapes that can be extruded into long logs, assembled, and then cut. Because of this, simplicity is key. Ubuntu Linux has a relatively simple logo, which as an added bonus, is round. This means that Ubuntu cookies are actually a pretty good place to start when practicing more complex designs.

You need four different colors of dough. About 2/3 to 3/4 of the dough will need to be plain. The rest of it will need to be divided into three equal portions. One portion will need to be yellow, one orange and one red. And if your red comes out pink, don't worry. Using food coloring to get something completely red is nearly impossible. Just do your best.
About 1/4 of each color will be used as the head. Go ahead and divide that out. Roll that small portion out into regular round little logs. Then move those logs to a sheet pan, and move that sheet pan to the freezer. Trust me, this will make things easier later. The rest of the dough needs to be rolled out into long rectangular logs of exactly the same size. You will also want to roll out some plain cookie dough into a long rectangular log the same thickness as the colored ones, but not so wide. Cut the plain dough lengthwise into thirds, and then assemble all your logs together, with a strip of plain dough between each color. By the way, you'll probably want to assemble all of this on a piece of parchment paper.

Take some more plain cookie dough and roll it into a nice, thick log. Then move that log on top of the colored pieces, and wrap them around it. If you had them set up on parchment, you can use the parchment to lift the dough up instead of having to use your fingers.

If you have a U-shaped terrine mold like mine, you can park your dough in there for the moment. This will help keep the dough nice and round. Since you probably don't have a terrine mold, you could probably cut a PVC pipe in half and use that. Since that is probably also a little too intensive for cookies, there is another solution to keep it round. After you put your dough in the fridge, just pull it out every few minutes or so and give it a quick roll, until it's cold enough to hold its shape. Or just let it sit and hope it doesn't get too lopsided. You might not want to chill it just yet, though.
Go ahead and roll out a thin sheet of plain cookie dough. Again, this will be easier in a moment if you do it on parchment. Take one of your really small, round logs out of the freezer and put it on the plain dough. Roll a thin layer of plain dough around it and set it aside. See how much easier that is with frozen dough? Go ahead and do all three, put them back in the freezer, and then take a breath because it's about to get a little tricky.

As you can see from the logo above, there is a little indentation on each color, where the head sits. Use the handle of a spatula, spoon, anything just about the side of your three little logs, to press a little space into each color of your big log. Go ahead and set that aside for now. Roll out a good bit of plain cookie dough. It'll be good to have that ready. Pull one of your little heads out of the freezer, and place it into one of the little spaces on the big log. Since the little log is frozen, and by this point the bug log is pretty pliable, you should be able to mash it in there a little and get a nice, tight fit. Remember: yellow arms have an orange head, red arms have a yellow head, and orange arms have a red head.

With all of the heads in place, go ahead and put the whole thing on top of your rolled out plain cookie dough and roll it all up. Make sure to apply a little pressure so that the dough all mashes into itself, so that there's no air holes left. When you look at it from the side, it will kind of, sort of look like an Ubuntu logo. Don't worry, it will look better when it's cut.

This completed log can be refrigerated for a few days, or frozen for up to a month. If you decide to freeze it, make sure it has a few hours to thaw in the fridge before you try to cut it. When you do cut it, you want your slices to be just shy of 1/4-inch thick. Lay them out on a piece of parchment so that the sides aren't touching. They won't spread very much, but they will spread a little. Bake them at 375F for about 10 to 12 minutes, until the edges just barely start to brown. Pull them and let them cool for a minute or two before moving the sheet of parchment from the cookie sheet to a cooling rack. Fresh from the oven, these cookies will be soft and just a little chewy. Fully cooled, they will be nice and crispy.

Remember, simplicity is key. Tomorrow I will post the Tux penguin cookies that I attempted to make before I did the Ubuntu logo. In retrospect, it wasn't bad for a first try. Then again, maybe I shouldn't have tried it in the first place. For those who will be in the Orem, UT area tomorrow evening and want to sample these cookies, I will bring some with me to this month's PLUG meeting.
The interesting thing is, gluten has a hard time developing in the presence of fat. The fat actually shortens the gluten strands. This is where vegetable shortening gets its name: it's frequently used in short doughs. In truth, butter, margarine and any other fat can do the same thing. And might I note, butter tastes a lot better than shortening. Because sugar cookie dough is so short, it can actually be worked like playdough. It can also be colored like playdough. And unlike playdough, it can even be flavored. And so without further ado, I present the ingredients:
1 1/2 cups unsalted butter, softened
2 cups granulated sugar
2 eggs
2 teaspoons vanilla
2 cups all-purpose flour
1 teaspoon baking powder
If you remember the creaming method from our chocolate chip cookies, then you know how to put this together: cream together the butter and sugar, slowly add the eggs and vanilla, and then whisk together the flour and baking powder before adding it as well. When it all comes together, wrap it in plastic wrap and toss it in the fridge for a couple of hours. I wondered once if chilling the dough really mattered. After my first attempt to work it before chilling it, I decided that it did matter, so don't skip this step. You can knead it later to make it pliable again.
You may notice that this is not a very wet dough. In fact, it's a good deal drier than the chocolate chip cookie dough. That's okay, because chocolate chip cookies only get to be scooped. These cookies get to be formed. In fact, they get to be rolled and formed into logs, chilled again, and then sliced into cookies. In fact, this form of sugar cookie is called a "refrigerator cookie" or "icebox cookie" for this very reason.
I have seen a couple different classic patterns with this type of dough. Both involve cutting the dough in half and giving each half a different color and flavor. Then you can roll each color out seperately into long little rectangles, lay one color on top of the other, and then roll those together lengthwise so that they form spirals when cut. Or you can form each color into a square log, cut lengthwise into smaller square logs, and then put those all together in a checkerboard pattern. Both are very popular designs. But who am I to conform?
It doesn't really surprise me that the best Linux distribution also has the logo that translates into the best sugar cookie. Let's face it: Ubuntu is one sweet distro. I apologize now to Canonical Ltd. for unauthorized use of their logo. Let's hope that in the spirit of Ubuntu, they will be as awesome in their forgiveness as they are in their flavor of Linux.
There are a couple of things to remember when forming a design with a log of sugar cookie dough. You will be breaking your design into shapes that can be extruded into long logs, assembled, and then cut. Because of this, simplicity is key. Ubuntu Linux has a relatively simple logo, which as an added bonus, is round. This means that Ubuntu cookies are actually a pretty good place to start when practicing more complex designs.
You need four different colors of dough. About 2/3 to 3/4 of the dough will need to be plain. The rest of it will need to be divided into three equal portions. One portion will need to be yellow, one orange and one red. And if your red comes out pink, don't worry. Using food coloring to get something completely red is nearly impossible. Just do your best.
About 1/4 of each color will be used as the head. Go ahead and divide that out. Roll that small portion out into regular round little logs. Then move those logs to a sheet pan, and move that sheet pan to the freezer. Trust me, this will make things easier later. The rest of the dough needs to be rolled out into long rectangular logs of exactly the same size. You will also want to roll out some plain cookie dough into a long rectangular log the same thickness as the colored ones, but not so wide. Cut the plain dough lengthwise into thirds, and then assemble all your logs together, with a strip of plain dough between each color. By the way, you'll probably want to assemble all of this on a piece of parchment paper.

Take some more plain cookie dough and roll it into a nice, thick log. Then move that log on top of the colored pieces, and wrap them around it. If you had them set up on parchment, you can use the parchment to lift the dough up instead of having to use your fingers.

If you have a U-shaped terrine mold like mine, you can park your dough in there for the moment. This will help keep the dough nice and round. Since you probably don't have a terrine mold, you could probably cut a PVC pipe in half and use that. Since that is probably also a little too intensive for cookies, there is another solution to keep it round. After you put your dough in the fridge, just pull it out every few minutes or so and give it a quick roll, until it's cold enough to hold its shape. Or just let it sit and hope it doesn't get too lopsided. You might not want to chill it just yet, though.
Go ahead and roll out a thin sheet of plain cookie dough. Again, this will be easier in a moment if you do it on parchment. Take one of your really small, round logs out of the freezer and put it on the plain dough. Roll a thin layer of plain dough around it and set it aside. See how much easier that is with frozen dough? Go ahead and do all three, put them back in the freezer, and then take a breath because it's about to get a little tricky.

As you can see from the logo above, there is a little indentation on each color, where the head sits. Use the handle of a spatula, spoon, anything just about the side of your three little logs, to press a little space into each color of your big log. Go ahead and set that aside for now. Roll out a good bit of plain cookie dough. It'll be good to have that ready. Pull one of your little heads out of the freezer, and place it into one of the little spaces on the big log. Since the little log is frozen, and by this point the bug log is pretty pliable, you should be able to mash it in there a little and get a nice, tight fit. Remember: yellow arms have an orange head, red arms have a yellow head, and orange arms have a red head.

With all of the heads in place, go ahead and put the whole thing on top of your rolled out plain cookie dough and roll it all up. Make sure to apply a little pressure so that the dough all mashes into itself, so that there's no air holes left. When you look at it from the side, it will kind of, sort of look like an Ubuntu logo. Don't worry, it will look better when it's cut.

This completed log can be refrigerated for a few days, or frozen for up to a month. If you decide to freeze it, make sure it has a few hours to thaw in the fridge before you try to cut it. When you do cut it, you want your slices to be just shy of 1/4-inch thick. Lay them out on a piece of parchment so that the sides aren't touching. They won't spread very much, but they will spread a little. Bake them at 375F for about 10 to 12 minutes, until the edges just barely start to brown. Pull them and let them cool for a minute or two before moving the sheet of parchment from the cookie sheet to a cooling rack. Fresh from the oven, these cookies will be soft and just a little chewy. Fully cooled, they will be nice and crispy.

Remember, simplicity is key. Tomorrow I will post the Tux penguin cookies that I attempted to make before I did the Ubuntu logo. In retrospect, it wasn't bad for a first try. Then again, maybe I shouldn't have tried it in the first place. For those who will be in the Orem, UT area tomorrow evening and want to sample these cookies, I will bring some with me to this month's PLUG meeting.
Monday, November 6, 2006
Brownies
I love brownies. Chewy, chocolatey goodness, often spiked with nuts or chocolate chips. Some years ago, I decided that I needed my own brownie recipe. I set about to study various brownie recipes, hoping to gain a basic understanding of the concept of the brownie and create my own recipe from scratch. This didn't quite happen the way I thought it would, because the first recipe I stumbled upon and tested ended up being a perfect representation of what a brownie truly is. Those of you interested in the perfect basic brownie recipe, click here.
However, perfect though that recipe may be on a generic basis, it's not my perfect recipe. I like things a little chewier, a little more moist, and with no nuts. I believe my changes to that recipe might be enough to call it my own. Those of you who have not yet read my posts on chocolate chip cookies may want to do so first. My ingredient list for brownies is:
6 oz unsweetened chocolate
3/4 cup unsalted butter
1 cup granulated sugar
1 cup dark brown sugar
3 whole chicken eggs
1 teaspoon vanilla extract
1/3 cup almond flour
2/3 cup bread flour
1 cup chocolate chips
1/2 cup chocolate cips for garnish
You will probably notice that my measurements aren't all that different from the original recipe, and yet there are still a few changes. First of all, I swapped half the granulated sugar out for dark brown sugar. Brown sugar is basically white sugar plus molasses, which is hygroscopic (meaning it attracts and retains moisture). Dark brown sugar has a higher ratio of molasses, which makes it a little more hygroscopic and gives it a little deeper flavor. This ability to literally grab moisture from the air will help keep your brownies from drying out.
I also switched from all-purpose flour to bread flour. Because bread flour contains a higher amount of protein, it tends to get stronger and chewier the more it gets worked. This is good for brownies. But I've found that just using wheat flour tends to make the flavor just a little flat. So I swapped out some of the wheat flour for almond flour. Unfortunately, almond flour contains no gluten, but the bread flour does help make up for that. In fact, I have been known to use the full amount of bread flour, in addition to the almond flour. Keep in mind though that this will throw off your wet to dry ration a little, so you may want to think about adding an additional egg yolk, or maybe a teaspoon of almond extract to up the flavor ante, or maybe even both! The world is your burrito. Or brownie.
Of course, I add no nuts to my brownies. Well, not anything that can actually be identified as nuts, at least. Almond flour is okay. Chunks of walnuts (like you see in so many brownie recipes) are not. That's just gross. But that doesn't mean you can't have chunkies. I opted for chocolate chips instead. In fact, I went with half white and half dark. This adds texture, little bursts of flavor, and even contrast. But be weary, any exposed white chocolate chips will pick up a bit of a tan in the oven. And speaking of a tan, don't forget to sprinkle an additional half a cup of chocolate chips on top. Yes, they will get melty in the oven. But oddly enough, I've found that melted chocolate manages to retain its form until acted upon by an ourside force, such as a spatula or fingers or something. So long as you let your brownies cool before messing with them, your chocolate chips will still look like chocolate chips when you're ready to serve.
Before we start putting everything together, go ahead and preheat your oven to 325F if you haven't done so already. First things first, get your pan prepared. These two steps should almost always be your first two steps, in any baking: preheat the oven, and get your pan ready. You'll need a well-greased 13x9 baking pan. I like to use a tempered glass baking pan, who's name rhymes with glamor rocker extrordinaire, T-Rex. I also like to line my pan with a sheet of parchment paper, with the sides sticking up a few inches. That's right, don't even bother trimming it. I'll tell you why later. But even if you do the parchment, make sure to spray the pan underneath it, so that the parchment has something to stick to.
With all that ready, we need that butter and chocolate melted. The original recipe has you do this in a microwave. I've never thought that to be that great of an idea, so I like to use a double boiler instead. Just put an inch or two of water in a saucepan and bring to a boil. Put a metal bowl over it (making sure that the bottom of the bowl doesn't touch the water) and drop the tempurature back to medium low. Don't bother to wait for it to cool, just go ahead and add your chocolate and butter. The smaller the pieces, the faster it will melt. Give it the occassional stir, until it's completely melted.
When it's all melted, go ahead and remove the bowl from the heat. Add the sugar and stir it all in. In fact, I just use a hand mixer to stir it in. The nice thing about this is that stirring or mixing will help cool the chocolate a little bit. If you've melted it properly, it won't be anywhere near hot enough to curdle the eggs, but it doesn't hurt to cool it either. Speaking of the eggs, it's time to mix those in, one at a time, along with any extracts or flavorings. It's kind of like the creaming method, except for the melted butter and chocolate.
When all the wet stuff is in there, go ahead and add your flours. Unlike the cookie dough, there's a lot more wet stuff than dry stuff, so it should incorporate quickly and easily. But don't stop there. I like to kick my mixer into high gear and keep working the batter until it actually starts to pull away from the side of the bowl, like bread does. That's how you know you've worked in a lot of gluten. This is important, because all that melted butter is working against you to keep that gluten from developling, and no gluten means less chewey brownies.
Go ahead and fold in your chocolate chips (or nuts if you're so inclined, or whatever else you feel like folding in). Is your pan ready? No? Didn't I tell you to do that first? See, now you have to go back and do that while who knows what happens to your brownie batter. Actually, it's almost a dough by this point, isn't it? Go ahead and spread that batter into your prepared pan. I find an offset spatula to be the easiest way to do this. Try to make sure it's all even, because the gluten will make it spread less in the pan than you'd think.
Into the oven with it! Your cooking time may vary, but I wouldn't start checking on it until at least 30 minutes in, if not a little longer. In fact, my last batch was pulled at about 40 minutes, and in retrospect, I thought that 45 might have been perfect. How do you know it's done? The toothpick test. Shove a toothpick in the center and if it's the least bit wet, it still has time to go. If a few crumbs stick to it, but it's still mostly clean, then it's about done. If it's completely dry, hurry and pull your brownies and hope that they're not overbaked. Just a quick note: if you have to do the toothpick test multiple times, make sure not to stick the toothpick in the same hole. Just try to stick the toothpick into some other place that won't be noticed.
When you pull your brownies, they won't actually be set up yet. They need time to cool and set up their structure. This doesn't mean that they're underbaked! The same principle applies to anything from baked custards to cake to some types of bread. But that doesn't mean you want to leave them in there to steam themselves to mushiness. Let them cool for about 10 minutes, and then use the parchment as a sling to pull them out and move them to a cooling rack. In another 10 - 20 minutes, they will likely be set up enough to cut, but still warm enough to experience that fresh oven-baked joy.
You might want to try baking my version first, or maybe even just the original. It will give you a good idea of what you're working with, so that you know what you can do with it. If you want to use nuts, go for it. If you want to sprinkle the top with toffee pieces, you won't be the first. I've done that many times myself. But I've also found that folding in toffee pieces makes for a drier brownie. I have no idea why. But at the same time, I've also had brownies where the baker froze Milky Way bars, smashed them into pieces, and then folded those in. Those were awesome. Whatever you do, just make sure you do it your own way. With luck, your great grandkids will be making your recipe with their great grandkids, and that's a nice thought.

Friday, November 3, 2006
Chocolate Chip Cookies Part 2
As far as I'm concerned, the most perfect cookie in the world is the chocolate chip cookie. It may only rank as America's second favorite cookie (after the Oreo), but it also ranks as America's favorite cookie to bake at home. But perfection doesn't come without a little work. That's why I'm going to cover a few more details on the chocolate chip cookie.
If you're like me, you used a #40 disher to scoop your cookies. This may be because you can't afford to buy every size disher out there, and the #40 seemed like a pretty decent size. Good on you. One handy thing about this size is that it's perfect for home-baked cookies. You don't really need massive cookies the size of a CD, like you see at the gas station. And you certainly don't need icky pink shortening frosting, spackled on like greasy grout. But I digress.
In professional bakeries, we use what's called a "full-size sheet pan". This pan is so huge, it doesn't fit into most home ovens. Fortunately, we also have what's called a "half sheet pan". As the name implies, this is half the size of the full sheet pan. It's also about the size of a standard cookie sheet. And while it tends to cost quite a bit more than a cookie sheet, it also tends to last years longer, and doesn't warp from the heat the first time you use it. I keep a stack of them in my kitchen.
As you may recall from my last post, I scoop all of my cookies before baking anything (except for the tester). Of course, I don't just scoop them onto a plate or something. I line a half sheet pan with a piece of parchment paper, and scoop them into rows on that. Then I chill the cookies, still on the sheet pan, at least for long enough for them to firm up. When I'm done, what do I do with that sheet of parchment? Of course I don't waste it. I use it to bake cookies too. Once I have cleared the cookies off of a sheet of parchment, it's ready to be used for its intended purpose: non-stick protection. In fact, I occassionally bake batches of cookies so large that I get a rotation going. I set up two half sheet pans full of cookies, toss them into the oven, and then set up two more pans. When the first set of pans comes out, I toss the second set in before moving the baked cookies to cooling racks. Then I put the used parchment back on the pans and wait for them to cool down. By the time they're cool enough to put cookies on without cooking them prematurely, the cookies in the oven are just about ready to come out. I line up new cookies on the parchment from the first set of cookies, and then they're ready to go back into the oven. Believe it or not, parchment can often be reused several times before needing replacement.
If you line up your cookies just right, you can fit eleven of them on a single half sheet pan. You need a row of four cookies, then three, then four. If you scooped smaller cookies, then you can add more rows, but it's important to keep your cookies staggered like bricks. This lets you cook the largest amount of cookies on a single sheet, without any of them baking into each other when they start to spread.

Didn't cover your cookies properly? Are they a little dry on top? If so, you're going to end up with a lot of cracks on the top of your cookie. People may not be able to tell that the dough was dry, but the cracks will serve as a constant reminder, and people will wonder why this batch is so different from the last batch. Fortunately, there is hope. When my cookies dry out, I like to spritz them with a little water. You don't want them to get soggy, but just a couple of sprays from your trusty little squirt bottle will make the dryness go away.
A lot of people really like gooey cookies. When I worked at a ski resort bakery, I would often see a line of skiers start to form at the bakery counter when they heard the timers on the cookie ovens go off. They didn't want the cookies on the counter. Those cookies were at least an hour old. They wanted gooey goodness, fresh from the oven. And who can blame them? Well, I've been told that gooey cookies are underbaked cookies. Don't you believe it. If a cookie is hard when it leaves the oven, then it's overbaked.
How do you know when the cookie is done? As your scooped cookies bake, they will begin to spread. As they spread, there will still be a little dome in the center. When it's time to test for doneness, that dome may still be there. If it's gone, pull your cookies and hope they're not overbaked. If it's still there, bang it against the oven rack. Don't bang it like you're trying to drive a nail, you don't want to start bending your oven racks or anything. If the center falls, then your cookies are done. If they still stand, they have more time to go. Gooey or no, your cookies should still sit for a minute or two, just to let the carry-over cooking finish them off. I like to give my cookies at least five minutes, to let them firm up enough that I can pick them up without them falling apart, but still be a little gooey and a lot chewy.

If you bake your cookies just right, they will actually stay chewy for a while. Amazingly, I have a few cookies left over from a batch last night, and they're still chewy. They'll probably even stay chewy and fresh for another day or two. When they start tasting a little stale, it's not time to throw them out just yet. A quick minute or two in a 300F oven will refresh the cookies and make them taste just like they did when they were freshly baked. But you can't pull this trick more than once or maybe twice, so only reheat what you think you're going to use.
What about long-term storage, after the cookies are baked? Unfortunately, refrigeration tempuratures (chilly, but not freezing) will actually promote staling. That's right, while refrigerating wheat-based products will retard things like mold and other nasty things you don't want to eat, it will also make them go stale faster. Fortunately, I have a little secret for you. Freezing tempuratures will actually slow the staling process, while also slowing other things like mold, etc. I've gotten away with freezing baked cookies for up to a couple of weeks, and then just refreshing them in the oven. They probably won't taste freshly baked anymore, but they'll be close, and I've found mine to be a little chewier.
That's the low-down on chocolate chip cookies, from a professional baker's perspective. Armed with this knowledge, you too can improve upon perfection in your own kitchen. Everyone has their own little things that they like to do with their cookies, and before long I'm sure you'll have your own version tweaked to your personal specifications, and then you will discover what is, for you, the perfect chocolate chip cookie.
Subscribe to:
Posts (Atom)