Sunday, March 29, 2009

Three Cheesecakes

I did a little experimenting with cheesecakes recently. Now, when I say experimenting, I mean these probably aren't what you think of when you think of cheesecake. And you know, that's a real shame, because these really are delicious. But if you're feeling a little iffy about them, don't worry. If you remember my mini gnome cheesecakes, you'll know that you can make little tiny versions of the cheesecakes to sample, and if you like it then just quadruple the recipe and make a big cheesecake. That's right, these cheesecakes can be made with empty tuna cans. Let's take them one at a time, and I apologize in advance for the monotonous photos.

Cheddar Apple Cheesecake


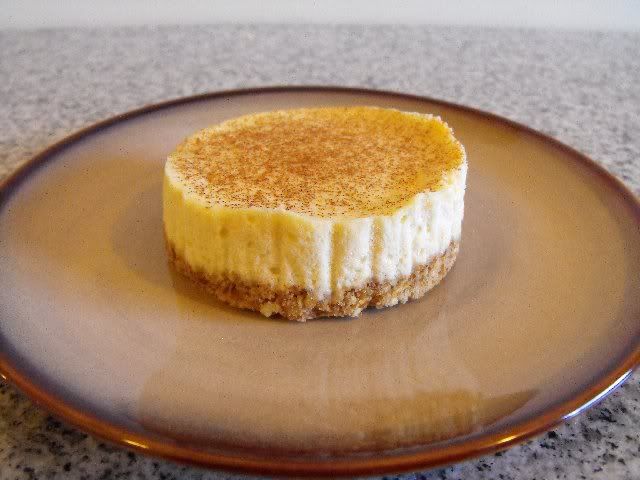
This may seem a little strange to anyone that lives outside of New England, but cheddar and apple really do go well together. And while this is a sweet cheesecake, I didn't want it to be too sweet, so I went with a pretzel crust. The sugar is actually an attempt to make the crust hold together a little better. After a few tests both ways, I think it worked. As you can see in the photo, I added a little cinnamon on top of the cheesecakes, which I think really makes it.

Crust:

5 Tbsp pretzel crumbs
1 Tbsp sugar
1 1/2 Tbsp butter

Filling:

8 oz cream cheese, softened
1/4 cup sugar
1 large egg
3 Tbsp unsweetened applesauce
1/2 cup shredded cheddar

Garnish:

Ground cinnamon, as needed

* Preheat oven to 350F.
* Prepare 4 empty tuna cans, as per the mini Gnome cheesecake recipe.
* Melt the butter, and toss with pretzel crumbs and sugar. Divide evenly among the tuna cans, about 2 Tbsp per can.
* Press crusts into the bottom of the cans.
* Blind-bake the crusts at 350F for 10 minutes.
* Allow crusts to cool completely on counter, and drop the oven temperature to 275F.
* Cream together the cream cheese and sugar.
* Mix in the egg.
* Mix in the apple sauce and cheddar.
* Divide the cream cheese mixture among the tuna cans.
* Sprinkle cinnamon on top of the cheesecakes.
* Bake at 275F for 15 minutes.
* Turn off the oven and leave the door open for one minute.
* Close the door and allow the cheesecakes to cool for 45 minutes with the oven.
* Chill overnight before serving.


Bacon and Onion Cheesecake


I'm not going to lie here. Savory cheesecakes freak people out, just like you already started freaking out when you read the name of this cheesecake. I think that this kind of cheesecake is actually what the tuna can form factor is perfect for. Yes, they are kind of intense to eat on their own. No, you wouldn't ever serve it for dessert. Tell you what, instead of thinking of it as cheesecake, how about if you think about it as a dip? The only difference between this and a cheeseball is that this is flat, and tastes way better.

Crust:

5 Tbsp pretzel crumbs
1 Tbsp sugar
1 1/2 Tbsp butter

Filling:

4 strips bacon
1 cup diced onion
1/2 cup diced red bell pepper
1/2 tsp chopped garlic
dash Worcestershire sauce
8 oz cream cheese, softened
1/4 cup sour cream
1 large egg
2 Tbsp whole milk

* Preheat oven to 350F.
* Prepare 4 empty tuna cans, as per the mini Gnome cheesecake recipe.
* Melt the butter, and toss with pretzel crumbs and sugar. Divide evenly among the tuna cans, about 2 Tbsp per can.
* Press crusts into the bottom of the cans.
* Blind-bake the crusts at 350F for 10 minutes.
* Allow crusts to cool completely on counter, and drop the oven temperature to 275F.
* Fry the bacon till nice and crispy. Remove from the pan to cool, but save the drippings.
* Saute the onion and bell pepper in the bacon drippings until nice and browned. When the onion gets transluscent, add the garlic and Worcestershire sauce. Allow to cool completely.
* Cream together the cream cheese and sour cream.
* Mix in the egg.
* Mix in the milk.
* Crumble the bacon, and fold into the cream cheese mixture with the veggies.
* Divide the cream cheese mixture among the tuna cans.
* Bake at 275F for 15 minutes.
* Turn off the oven and leave the door open for one minute.
* Close the door and allow the cheesecakes to cool for 45 minutes with the oven.
* Chill overnight before serving.


Chinese Five-Spice Cheesecake


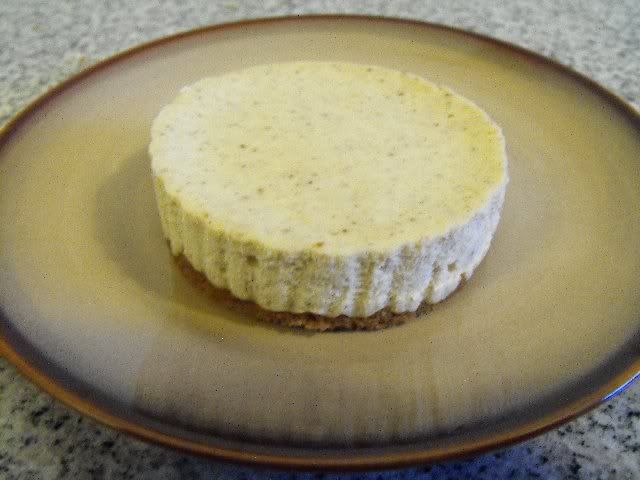
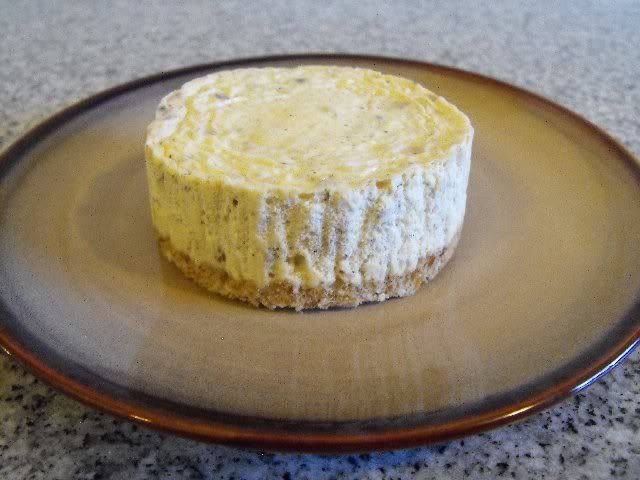
Okay, so maybe the savory cheesecake was a little weird. And this one probably seems weird too. Don't worry, this is probably the most normal of these cheesecakes. Depending on who makes it, Chinese Five-Spice tends to have ingredients like cinnamon, cloves, nutmeg, ginger, allspice, things like that. Kind of like a pumpkin pie. I even threw in a gingersnap crust, which is excellent. You'll like this one.

Crust:

5 Tbsp gingersnap crumbs
1 Tbsp sugar
1 1/2 Tbsp butter

Filling:

8 oz cream cheese, softened
1/4 cup sugar
1 large egg
1 tsp Chinese Five-Spice powder

* Preheat oven to 350F.
* Prepare 4 empty tuna cans, as per the mini Gnome cheesecake recipe.
* Melt the butter, and toss with gingersnap crumbs and sugar. Divide evenly among the tuna cans, about 2 Tbsp per can.
* Press crusts into the bottom of the cans.
* Blind-bake the crusts at 350F for 10 minutes.
* Allow crusts to cool completely on counter, and drop the oven temperature to 275F.
* Cream together the cream cheese and sugar.
* Mix in the egg.
* Mix in the spices.
* Divide the cream cheese mixture among the tuna cans.
* Bake at 275F for 15 minutes.
* Turn off the oven and leave the door open for one minute.
* Close the door and allow the cheesecakes to cool for 45 minutes with the oven.
* Chill overnight before serving.

Friday, February 27, 2009

Checking for open files

A coworker presented me with an interesting problem today. We have an SFTP server set up, where a client is uploading a series of files on a pretty regular basis. My coworker needed to process the files as soon as they were finished uploading, but he didn't know how to tell when it was finished. Since the SFTP server would be keeping the file open until it was finished writing it, all we needed to do was find out whether the file was still open.

In Bash, there's an easy way to check for this. When called without any arguments, the lsof program shows a list of all open files on the system. You can also call it with the full path of the filename that you are checking, and it will show only the processes that have that file open. For example, we can look at /dev/null, which seems to pretty much always be open on my system:

$ lsof /dev/null
COMMAND PID USER FD TYPE DEVICE SIZE NODE NAME
gconfd-2 6668 jhall 0u CHR 1,3 6663 /dev/null
gconfd-2 6668 jhall 1u CHR 1,3 6663 /dev/null
gconfd-2 6668 jhall 2u CHR 1,3 6663 /dev/null
...snip...

The lsof program also has an exit status of 0 if it returns any information, and an exit status of 1 if it did not. Since we're only interested in that error status and not in any of the information returned, we can throw it away by redirecting STDOUT and STDERR to /dev/null with &>:

$ lsof /dev/null &> /dev/null && echo "The file is open" || echo "The file is not open"
The file is open

Breaking this down a little further, if "lsof /dev/null &> /dev/null" was successful (returned an error status of 0), then it will run the first echo command. If not, that will make both the lsof command and the first echo command unsuccessful (error status of 1 for both) and the echo command after the pipes will run.

If it's a little confusing having "/dev/null" in that command twice, try running it on a file that's likely to not be open, like /proc/cpuinfo:

$ lsof /proc/cpuinfo &> /dev/null && echo "The file is open" || echo "The file is not open"
The file is not open

Just a handy little bit of Bash Fu to brighten your day.

Wednesday, February 25, 2009

Ginger Beer Test #1


Those who know me well know that one of my favorite things in life is a good ginger beer. Not sugary-sweet ginger ale, but real, spicy, knock-you-off-your-feet ginger beer. I've been wanting to make it for a couple of years now, I just hadn't gotten around to it. Well, this week I finally got off my butt and gave it a try. This batch was a test run, to help me get my bearings. There will be more.

But first, we need to define what exactly makes a good ginger beer. It depends on who you are really, and I'm going to guess that my definition is probably not the same as yours. My three favorite brands are, in order:

Okay, so Vernors is really a ginger ale, but it's still up there. There are a few properties to look for in ginger ale and ginger beer. First of all, ginger ales are generally divided into two categories: golden and dry. I've found golden to be a little darker, sweeter, and more strongly-flavored. Unfortunately, it's near-impossible to find. Dry ginger ale is lighter, and extremely common. Being a Utah boy, I grew up on Canada Dry and Schweppes, but when I lived in New Hampshire I got used to Seagrams too.

But these really lack something in my opinion, and that's real ginger. I like mine spicy, but not harsh. Smoothness is also important to me, but not so much as spiciness. And that's where ginger beer comes in. It's stronger, tastes more like ginger, is often brewed, and the good stuff almost always has little fibers of real ginger in it.

I've tried a lot of different kinds of ginger beer, and I've divided (most of) my favorites into two categories: Jamaican-style and Australian-style. Jamaican ginger beer is spicy, strong, and has been known to make me cough, just getting a whiff of a newly-opened bottle. Unfortunately, it generally seems to be harsh, overly-spicy, and flavored with other spices in addition to ginger. In the small, relatively unknown world of ginger beers, this seems to be the most common, and I've probably tried a good 20 or 30 different brands, but few more than once.

Australian ginger beer is different. I've had a good dozen or so different types of this, and few of them miss their mark. They're strongly-flavored, spicy, but also smooth. They seem to be true to the ginger flavor, and when I get ahold of a few bottles, they don't remain full for long. It was this variety that I was looking to reproduce.

The first task of course was to find some recipes. I wasn't sure yet whether I was going to make a composite recipe, I was just looking to see what I could find. Most of the recipes I came across were long and ridiculously complex. One of them had a longer list of equipment than actual ingredients. Finally, I found a recipe on Recipezaar that was simple, but kind of long and very poorly-written. It seemed to be more of a Jamaican recipe, but I figured you've gotta start somewhere.

I didn't use the recipe as-is of course. I made a few changes, and then took notes while I more or less followed their directions. My ingredient list was as follows:

1/2 tsp yeast
1/2 cup warm water (110F)
1 3/4 liter water
3/4 oz/wt freshly-grated ginger
1/4 tsp anise
5 whole cloves
1/2 cup sugar

I sprinkled the year in the 1/2 cup of warm water and set it aside. I then mixed together all of the other ingredients in a sauce pan, brought it to a boil, and then dropped it to a simmer for 5 minutes. I then killed then heat and let it cool on the counter to 110F (actually, 112F to be exact, but anything below 120F is fine), and then poured in the yeast/water mixture.

I poured all of this (whole spices and all) into a clean 2-liter bottle, pressed in the sides a little, screwed on the cap and let it sit overnight on the counter. In the morning, the bottle was completely inflated, and you could tell by feeling it that there was a lot of pressure inside. I moved this to the fridge and let it sit until the next evening.

I tasted the brew before I added the yeast, and I knew I was already in trouble. It was extremely spicy, and the anise overpowered everything. But I was determined to let it age for a couple of days so that I could get a good idea of what it would be like.

When we uncorked it, there was a lot of sediment. This is to be expected with home-brewed drinks. But it's not something I would want to drink, so I poured it through a tea strainer into some cups and tasted it with my wife and her friend visiting from Wisconsin. Unfortunately, this means I also strained out the ginger fibers, but since we were just about to drink it, I figured it wouldn't be adding any more flavor anyway.

First of all, the color. It was more cloudy than I expected. I'm okay with that. Next, the carbonation. It was lightly carbonated, not as much as commercial ginger beer, but still decent. Finally, the flavor. It was very spicy, but not as bad as I had feared. The anise still overpowered everything, but it still had a lot of ginger in the finish, to come back and bite you. I suspect the clove was about right (if you like that sort of thing; I'm currently undecided), but that anise just screwed it all up. It was just a little bit sweet for me, but not bad.

Just a quick note on drinks carbonated with yeast. This is exactly how beer is made. When the yeast gets going, it produces lots of carbon dioxide and a little bit of alcohol. That's what makes bread rise, and makes beer fizzy. Since my brew had only a tiny amount of yeast, and was only allowed to ferment for a couple of days, the alcohol content was negligable. If that is of concern to you, this is the wrong recipe for you.

I will be starting another bottle tomorrow night, when this one is used up. Now that I have my bearings, I think I have an idea of where I want to take it. I'm going to try multiple changes at first, and then fine-tune it as I get closer to what I want. The next batch will have no anise. That was just a bad idea. I will leave the cloves in there, and probably use the same amount of ginger. This time I'm thinking I may add some lemon juice, and drop the sugar down to 1/3 of a cup. I hope to post results this weekend.

Wednesday, February 18, 2009

Plex Cake

It's been a while since I posted, and I'm going to blame that at least partly on being busy. But I did want to share a cake with you that I made this past weekend. It was my daughter's second birthday, and she is a huge Yo Gabba Gabba fan. In fact, she has been watching it almost since her first birthday, so it should come as no surprise that I've been looking forward to making this cake for several months.

Plex is a robot member of the cast, and is probably one of the most popular cakes for parents to try to make for their kids. But up until this point, I have't seen one with fondant like this, so I'm going to declare myself in the lead. First, the cake:


The yellow part is a white chocolate rolled fondant recipe that I've been working on for a while. It's not quite to where I want it, but it's getting there. The cake was a chocolate cake based on a recipe I found online. It it filled with a chocolate mousse based on a recipe by Alton Brown and fresh raspberries. Anything you see that is covered with white fondant (except for the eyes) is molded from crispy rice treats. And the antenna is a cigar cookie wrapped in semi-sweet chocolate.

The black square where his eyes are was actually about half an inch higher, but it seemed to have slipped down during transportation. I eventually gave up on trying to make the ball on the top of his antenna red, or trying to make his ears at all. And no, I never planned to attach even parts of his arms to his shoulders. Deal with it.

It was kind of a fun cake to build, but like all cakes that I make like this, I was reminded repeatedly why I don't often make cakes like this. The fondant didn't want to cooperate (I think I may have added just a touch too much white chocolate to it), keeping the chocolate in temper for that antenna was a miracle (the four backup antennas that I made all lost their temper) and speaking of the antenna, when I opened the tin of cigar cookies, they were all broken. Actually, that's pretty much why I decided to wrap it in chocolate; it was actually a couple of pieces of broken cigar cookie, reinforced with chocolate.

I'm going to go ahead and post my fondant recipe here, because I seem to keep losing it. It is not the easiest thing to make, and I only recommend it for those who are truly serious. I use a stand mixer for part of making this, but heed well this warning: if you try to make it from start to finish with any kind of electric mixer, you will burn out the motor! And yes, this recipe is measured entirely by weight. If you're not willing to weigh the ingredients, you're not serious enough to make it.

White Chocolate Rolled Fondant (still considered a test recipe)

0.5 oz/wt powdered gelatin
2.1 oz/wt cold water
0.8 oz/wt glycerin
9.6 oz/wt corn syrup
10.5 oz/wt white chocolate
2 lbs confectioners sugar + extra just in case

* Bloom the gelatin in cold water for 3 minutes.
* Start melting the white chocolate gently over a double-burner.
* Add the glycerin and corn syrup. Heat gently to dissolve, while whisking occassionally.
* Remove everything from the heat, and whisk in the white chocolate.
* Add the mixture and all of the sugar to a stand mixer use the paddle to mix on low.
* When the mixer starts to sound as if it is having trouble, turn it off and finish kneading the mixture by hand. I have found that using a bowl scraper to cut and mix the fondant helps keep your hands clean.
* If the mixture seems to be too wet and sticky, sprinkle in some more sugar.
* When you have formed a homogeneous ball of dough, move into an air-tight container for a couple of hours to let it rest.

Like I said, I still consider this recipe in a testing stage. It clearly requires more than 2 lbs of sugar, but I'm not sure how much more. If I had to guess, I'd say it was just a couple of ounces, maybe as much as half a cup. Also, I originally went with only 10 oz of white chocolate, and the fondant seemed a little too pliable. 10.5 oz made it a little too hard. Next time around, I'm going to go with 10.25 oz of white chocolate and see how it goes. I think that the rest of the ingredients are pretty solid, it's just a matter of getting the best measurements for the sugar and the chocolate.

Thursday, January 22, 2009

A Quick SNMP Primer

Just a quick disclaimer to go with my quick primer: I'm relatively new to SNMP myself. This article doesn't aim or claim to be comprehensive. It's just meant to help you get started.

SNMP is the Simple Network Management Protocol. It has been said that not only is it not simple, but it's usually used for monitoring more than managing devices. I don't fully agree with this sentiment. It does have some weirdness, but once you get over that it's not so bad.

Structure of Management Information

Before we get into practical usage, we need to talk theory. SNMP partly describes a network protocol, but it also describes an organizational structure. This structure is called the Structure of Management Information, or SMI for short. This is a tree that branches out into various nodes called Object Identidiers, or OIDs. Each level of this tree has its own set of numbers for each node. At the moment, we're only concerned with a specific path in this tree, sometimes referred to as MIB-II, or the Management Information Base. The OID for this node is 1.3.6.1.2.1.

This node is actually the root of where our queries are performed. In fact, a lot of times this OID is just printed as mib-2. The nodes underneath this are what we will be querying.

Some of the nodes that we're interested in here are system (1), interfaces (2), at (3), ip (4) and so on. For example, the OID that describes a system is mib-2.system.sysDescr.0. The long name for this is .iso.org.dod.internet.mgmt.mib-2.system.sysDescr.0, and the numerical notation for this is .1.3.6.1.2.1.1.1.0. On my Linux box, this is often the output of the "uname -a" command.

If you need some time to digest this part, go for it. I think this is the biggest thing to overcome with SNMP. When you're ready, come back for the next part.

SNMP Versions

There are three main versions of SNMP that you will run into: 1, 2c and 3. Version 2c is the community version of version 2, and while it does provide a little extra information, it isn't much of an improvement over version 1.

These two versions use passwords called community strings to provide access. There is a read-only community used for monitoring (reading values from the device), and a read/write community used for management (setting values on the device). The most common default community string for read-only access is "public". The most common default community string for read/write access is "private".

Most SNMP-enabled devices have these as their defaults, and as we all know, most sysadmins are still too lazy to change the defaults. Fortunately, the Net-SNMP package in Linux has a little bit better default configuration. It is set to only listen to requests from the local machine. Even better, the Net-SNMP server isn't installed by default on most Linux distributions, so don't worry about your system being vulnerable like that out of the box.

SNMP version 3 introduced the concept of usernames and passwords, rather than just communities. But versions 1, 2c and 3 all suffer from one major shortcoming: they send their authentication and their data in the clear. Fortunately, version 3 also supports encryption for either authentication or data transfer or both.

Setting Up SNMP

Installation is easy, but there are a couple of different packages that you want. On RHEL5 and Fedora 10:

yum install net-snmp net-snmp-utils

On Ubuntu:

apt-get install snmpd snmp

For those of you who are interested, net-snmp == snmpd and net-snmp-utils == snmp.

Once you have it installed, go ahead and blow away the configuration file:

mv /etc/snmp/snmpd.conf /etc/snmp/snmpd.conf.orig

The default configuration is a lot to deal with. We're going to keep it simple. Create a new /etc/snmp/snmpd.conf file with the following line:

rocommunity yourcommunitystring

...where yourcommunitystring is, of course, whatever community string you want to use. This is really all the configuration you need for versions 1 and 2c, though you can add more if you like.

If you want version 3 instead, the configuration is a little different. There are actually two files to edit here, and the second one probably doesn't exist by default. First, edit the /etc/snmp/snmpd.conf file and add the following line:

rouser username

...where username is of course the username that you want to use. You'll also need to set up a password. Of course, we would never want to use a plaintext password if we didn't want to. Depending on your version of Net-SNMP, we have a few options available to us. We can use either MD5 or SHA for authentication, and DES (or AES in more recent versions) for data transfer. I'm going to assume that you want to use SHA and DES. Create if necessary and edit the /var/net-snmp/snmpd.conf file and add the following line:

createUser username SHA password1 DES password2

...where username is of course the username that you specified in the /etc/snmp/snmpd.conf file, password1 is your SHA password and password2 is your DES password. I know it seems kind of scary to leave passwords out in the open in plain text files like this, but don't worry; as soon as SNMP starts up, it will rewrite this file and encrypt the passwords. I should also note that this is the only time you will ever edit this file by hand, and the createUser line is the only line that you will ever add to it.

When you're ready to start the SNMP service, type in:

chkconfig snmpd on (RHEL/Fedora systems only)
/etc/init.d/snmpd start


Viewing SNMP Data

There are several commands available for viewing SNMP data, but I'll start you off with just the snmpwalk and snmpget commands for now. Once you get the hang of them, you can start exploring other commands. Usage does differ slightly between versions 1 and 2c, and version 3, but only in authentication.

If you added the rocommunity line to your /etc/snmp/snmpd.conf file, use the following command to take a look at your MIB-II tree:

snmpwalk -v 2c -c yourcommunitystring localhost | less

We're piping the output of the command to less because there can be a lot of information here. You've probably guessed that the -v option specifies the version (1 or 2c) and the -c option specifies the community string. The first line probably looks something like this:

SNMPv2-MIB::sysDescr.0 = Linux bourdain 2.6.24-22-generic #1 SMP Mon Nov 24 18:32:42 UTC 2008 i686 GNU/Linux

Let's make the names little more verbose. Hit 'q' to exit out of this, and try this command:

snmpwalk -v 2c -c yourcommunitystring -Of localhost | less

For your reference, that is a capital letter O, not the number zero. When you look at the output of this command, it probably looks more like this:

.iso.org.dod.internet.mgmt.mib-2.system.sysDescr.0 = Linux bourdain 2.6.24-22-generic #1 SMP Mon Nov 24 18:32:42 UTC 2008 i686 GNU/Linux

Hey, you want to really have some fun? Try out this command instead:

snmpwalk -v 2c -c yourcommunitystring -On localhost | less

Now you get the name in numerical format:

.1.3.6.1.2.1.1.1.0 = STRING: Linux bourdain 2.6.24-22-generic #1 SMP Mon Nov 24 18:32:42 UTC 2008 i686 GNU/Linux

The amusement never ends. Going back to the full naming format, you'll notice that the first set of lines is in the system node:

.iso.org.dod.internet.mgmt.mib-2.system...

If you scroll down a little, you'll find the interfaces node:

.iso.org.dod.internet.mgmt.mib-2.interfaces...

We can specify to walk only one of these nodes if we like. Since we're only looking at information under the mib-2 node, we can actually just refer to it by that one group name:

snmpwalk -v 2c -c yourcommunitystring -Of localhost system | less

Now you will only see information in the system group. If you know the exact location of a value that you want to look at, you can use the snmpget command to look at it. The syntax is almost identical to snmpwalk:

snmpget -v 2c -c yourcommunitystring -Of localhost system.sysDescr.0

Now that you know how to get information using community strings, let's switch back to SNMPv3. When we specify "-v 3", we must specify the -u option with a username, instead of the -c option. We also need to let it know what passwords we're using, and how to encrypt them. Your basic snmpwalk command will look something like this:

snmpwalk -v 3 -u username -a SHA -A password1 -x DES -X password2 -l authNoPriv localhost | less

If you were able to follow along okay when we set these passwords, then most of this line already makes sense to you. The big things to remember now are what options go with what values, and the security level.

The "-l" option can specify one of three levels: noAuthNoPriv, authNoPriv or authPriv. If for some unknown reason you decide not to use passwords, you would set this to noAuthNoPriv. Otherwise you would use authNoPriv for read-only access or authPriv for read/write access.

I'm not going to bore you with the output of this command, because you've already seen it. You can use -Of or -On to modify the output, you can specify a group, you can do pretty much whatever you were doing with v1 or v2. The only real difference is authentication. And yes, the snmpget command looks pretty much the same.

In fact, once you have a handle on these couple of commands, this would probably be a good time to check the man page for snmpcmd. There is not actually a command called snmpcmd, this page just shows you the options that are common to the whole suite of Net-SNMP commands.

Hopefully this gives you a good foundation for playing with SNMP on your Linux box. Of course, there are volumes written on the subject, and my little artcle doesn't even attempt to cover what they will. But hopefully they will get you over any initial fears about it and get you up and running.
Wednesday, January 21, 2009

Monitoring Apache Processes with Cacti

I've been setting up Cacti at work to monitor our servers. Last night it occured to me that it might be useful to monitor Apache processes on our web servers. Cacti already has a graph built in for monitoring processes in general, but I just wanted those that matched "httpd". It was a simple thing that I wanted, but setting it up proved to be non-trivial, so I thought I'd share how I set it up. Keep in mind that this is on a RHEL5.2 box. Your distribution may vary.

First of all, you need a script to gather the information. You already have one mostly built, so use it as a template:

cd /var/lib/cacti/scripts/
cp unix_processes.pl unix_apache_processes.pl

Edit that file so that it looks like this:

#!/usr/bin/perl

open(PROCESS, "ps ax | grep httpd | grep -c : |");
$output = ;
close(PROCESS);
chomp($output);
print $output;

Now you need to set up Cacti to use that script. Go into the Console tab in Cacti and click on "Data Input Methods". Click "Add", and use the following values:

Name: Unix - Get Apache Processes
Input Type: Script/Command
Input String: perl /scripts/unix_apache_processes.pl

Save it, then go back in and click on "Add" for "Output Fields". Use the following values:

Field [Output]: proc
Friendly Name: Number of Apache Processes
Update RRD File: (checked)

Go ahead and save it. Now go into "Graph Templates" and find the "Unix - Processes" template. Put a check next to it, go find the drop-down box next to "Choose an action", set it to "Duplicate" and click "go". Change the title to "Unix - Apache Processes" and save it.

Go back into "Graph Templates" and click on the "Unix - Apache Processes" template that you just created. Find everything that says "Processes" and change it to say "Apache Processes", then save it.

Go into "Data Templates" and find "Unix Processes". Duplicate it like you did with the Graph Template, calling the new template "Apache Processes". Then go back into it and change the "Data Input Method" drop-down to "Unix - Get Apache Processes".

Go back into "Graph Templates", then "Unix - Apache Processes" again and click on "Item # 1". Change the "Data Source" drop-down to "Apache Processes - (proc)" and hit "save". Do the same for "Item # 2", "Item # 3" and "Item # 4".

Now when you go into the "Devices" menu and click on one of your web servers, you should see "Unix - Apache Processes" show up on the drop-down box for "Associated Graph Templates". Go ahead and add it, then go up to the top of the device page and click "Create Graphs for this Host". Put a check next to "Unix - Apache Processes" and click "Create".

Setting up this graph may be pretty straight-forward for the average Cacti user, but there are a lot of steps, and it helps to do them in the right order. This walkthrough should give you a good start for adding more complex graphs to Cacti when you need to.

Saturday, January 3, 2009

Pork Enchiladas

I love enchiladas. I remember my dad making them when I grew up. Of course, his were a little different than mine. For instance, he used corn tortillas. And he seemed to like cheese-only enchiladas. I kind of liked 'em like that. But I've discovered that my wife doesn't seem to like cheese-only enchiladas. And I got fed up with corn tortillas long ago. They crack when you try to roll them, they... well, they crack. Isn't that bad enough?

Lately I've been playing with enchilada sauce. Really, isn't it just a thinned out tomato and chile sauce? I decided to try a little experiment: canned tomato sauce plus taco seasoning. Hey, it's actually not bad. It's a little thick, but it's very close in flavor to some of the store-bought enchilada sauces.

So bearing all this in mind, let me share with you an enchilada recipe that my family has been eating on occassion lately. It's not exactly traditional, but we like it. But if you want to go back to corn tortillas or something, go for it. You won't hurt my feelings.

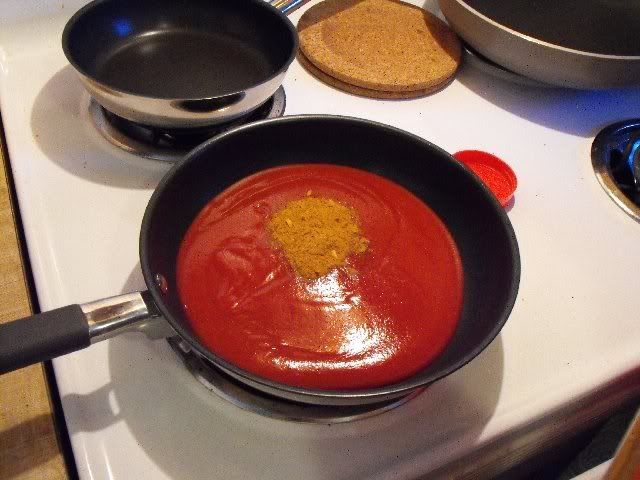
First off, you'll need your enchilada sauce. Whether you use the "real" stuff or you do it my way, it helps to heat it up. I like to use a wide frying pan, to have enough room to dip the tortillas in later. With my version, you need a can of tomato sauce and a couple of Tablespoons of taco seasoning.

Stir it all together and heat it up to about a simmer. You don't need to boil it or anything, it just needs to be heated a little. If you want, you can thin it out with a little bit of liquid. Water would be fine, but broth would be better. Once it's ready, put it together with the rest of your ingredients and equipment.

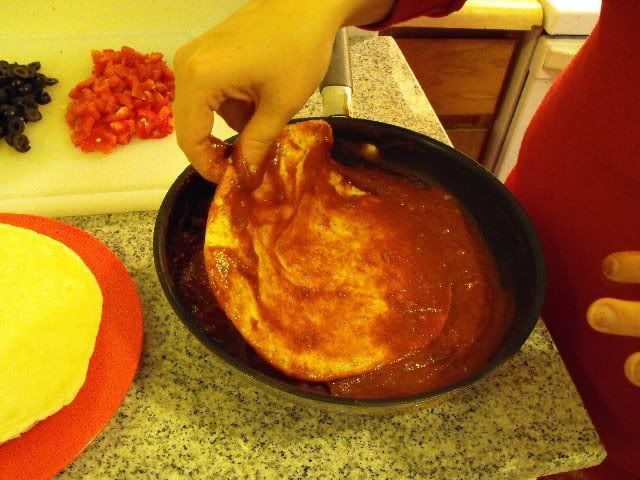
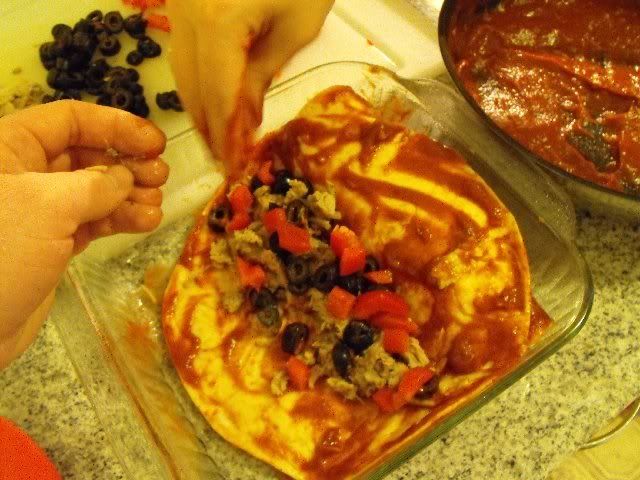
We have cheddar cheese, chopped pork, sliced olives, red bell peppers, an 8x8 baking pan, four 8-inch flour tortillas, and a pan full of enchilada sauce. Just a note: about one enchilada in, we put the baking pan next to the enchilada sauce. Step one, coat a tortilla with sauce:

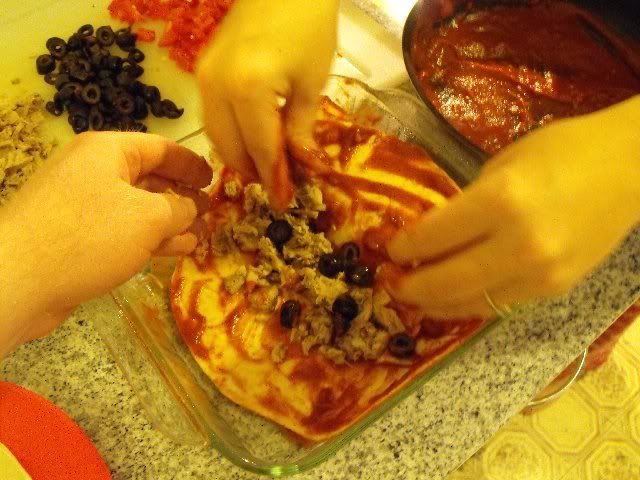
Move it to the baking pan and add a hanful of chopped pork:

Olives go in next:

Chopped red bell peppers:

And of course, some cheese:

Roll it up and repeat with the rest of the tortillas. You'll want to use all of the pork inside, but be sure to save some of the olives, peppers and cheese for the top. At some point, it's going to look kind of like this:

Go ahead and cover it with a bit of cheese:

Add the remaining olives:

And the remaining peppers:

Slide it into the oven at 350F, until the cheese starts to bubble. It'll probably take about 15 minutes or so.

Oh, so tasty.